
Page 18 - Adobe InDesign 2021
P. 18
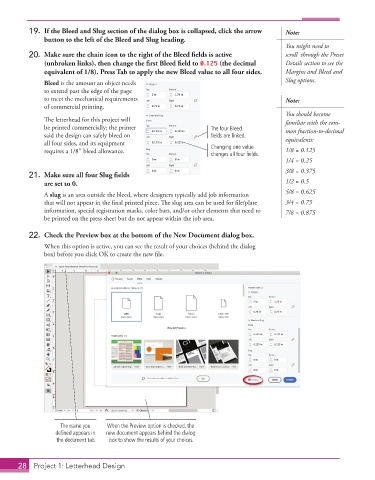
19.  If the Bleed and Slug section of the dialog box is collapsed, click the arrow   Note:
              button to the left of the Bleed and Slug heading.
                                                                                        You might need to
          20.  Make sure the chain icon to the right of the Bleed fi elds is active     scroll  through the Preset
              (unbroken links), then change the first Bleed field to 0.125 (the decimal   Details section to see the


              equivalent of 1/8). Press Tab to apply the new Bleed value to all four sides.  Margins and Bleed and
               Bleed is the amount an object needs                                      Slug options.
               to extend past the edge of the page
               to meet the mechanical requirements                                      Note:
               of commercial printing.
                                                                                        You should become

               The letterhead for this project will                                     familiar with the com-
               be printed commercially; the printer              The four Bleed         mon fraction-to-decimal
               said the design can safely bleed on               fields are linked.
               all four sides, and its equipment                                        equivalents:
               requires a 1/8″ bleed allowance.                  Changing one value     1/8 = 0.125
                                                                 changes all four fields.
                                                                                        1/4 = 0.25
                                                                                        3/8 = 0.375
          21.  Make sure all four Slug fi elds
              are set to 0.                                                             1/2 = 0.5
                                                                                        5/8 = 0.625
               A slug is an area outside the bleed, where designers typically add job information


               that will not appear in the final printed piece. The slug area can be used for file/plate   3/4 = 0.75
               information, special registration marks, color bars, and/or other elements that need to   7/8 = 0.875
               be printed on the press sheet but do not appear within the job area.
          22.  Check the Preview box at the bottom of the New Document dialog box.
               When this option is active, you can see the result of your choices (behind the dialog

               box) before you click OK to create the new file.


                   The name you   When the Preview option is checked, the
                  defined appears in   new document appears behind the dialog
                  the document tab.  box to show the results of your choices.


       28  Project 1: Letterhead Design