


Page 26 - CC2017_AI_Look_Inside
P. 26
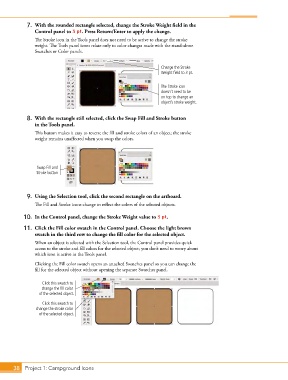
7.  With the rounded rectangle selected, change the Stroke Weight field in the
               Control panel to 3 pt. Press Return/Enter to apply the change.

               The Stroke icon in the Tools panel does not need to be active to change the stroke
               weight. The Tools panel icons relate only to color changes made with the stand-alone
               Swatches or Color panels.


                                                                   Change the Stroke
                                                                   Weight field to 3 pt.


                                                                   The Stroke icon
                                                                   doesn’t need to be
                                                                   on top to change an
                                                                   object’s stroke weight.


            8.  With the rectangle still selected, click the Swap Fill and Stroke button
               in the Tools panel.

               This button makes it easy to reverse the fill and stroke colors of an object; the stroke
               weight remains unaffected when you swap the colors.


                Swap Fill and
                Stroke button


            9.  Using the Selection tool, click the second rectangle on the artboard.
               The Fill and Stroke icons change to reflect the colors of the selected objects.

           10.  In the Control panel, change the Stroke Weight value to 3 pt.

           11.  Click the Fill color swatch in the Control panel. Choose the light brown
               swatch in the third row to change the fill color for the selected object.
               When an object is selected with the Selection tool, the Control panel provides quick
               access to the stroke and fill colors for the selected object; you don’t need to worry about
               which icon is active in the Tools panel.
               Clicking the Fill color swatch opens an attached Swatches panel so you can change the
               fill for the selected object without opening the separate Swatches panel.

                  Click this swatch to
                  change the fill color
                 of the selected object.

                  Click this swatch to
                change the stroke color
                 of the selected object.


       38 Project 1: Campground Icons

