


Page 22 - CC2017_AI_Look_Inside
P. 22
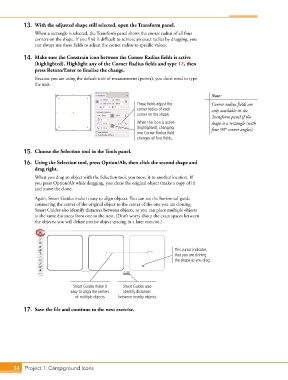
13.  With the adjusted shape still selected, open the Transform panel.
               When a rectangle is selected, the Transform panel shows the corner radius of all four
               corners on the shape. If you find it difficult to achieve an exact radius by dragging, you
               can always use these fields to adjust the corner radius to specific values.

           14.  Make sure the Constrain icon between the Corner Radius fields is active
               (highlighted). Highlight any of the Corner Radius fields and type 12, then
               press Return/Enter to finalize the change.
               Because you are using the default unit of measurement (points), you don’t need to type
               the unit.

                                                                                        Note:
                                                          These fields adjust the       Corner radius fields are
                                                          corner radius of each         only available in the
                                                          corner on the shape.
                                                                                        Transform panel if the
                                                          When this icon is active      shape is a rectangle (with
                                                          (highlighted), changing       four 90° corner angles).
                                                          one Corner Radius field
                                                          changes all four fields.

           15.  Choose the Selection tool in the Tools panel.

           16.  Using the Selection tool, press Option/Alt, then click the second shape and
               drag right.
               When you drag an object with the Selection tool, you move it to another location. If
               you press Option/Alt while dragging, you clone the original object (make a copy of it)
               and move the clone.
               Again, Smart Guides make it easy to align objects. You can see the horizontal guide
               connecting the center of the original object to the center of the one you are cloning.
               Smart Guides also identify distances between objects, so you can place multiple objects
               at the same distances from one to the next. (Don’t worry about the exact spaces between
               the objects; you will define precise object spacing in a later exercise.)


                                                                         This cursor indicates
                                                                         that you are cloning
                                                                         the shape as you drag.


                               Smart Guides make it   Smart Guides also
                              easy to align the centers   identify distances
                                of multiple objects.  between nearby objects.

           17.  Save the file and continue to the next exercise.


       34 Project 1: Campground Icons

