
Page 20 - Adobe Illustrator CC 2020
P. 20
Draw Rounded Rectangles
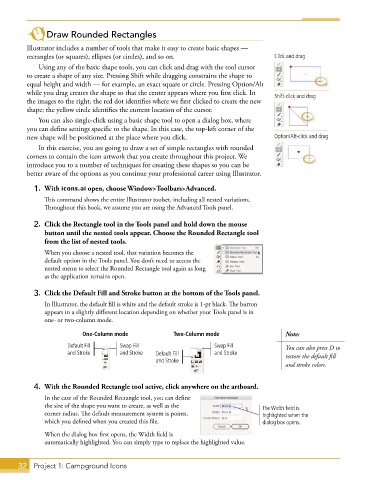
Illustrator includes a number of tools that make it easy to create basic shapes —
rectangles (or squares), ellipses (or circles), and so on. Click and drag
Using any of the basic shape tools, you can click and drag with the tool cursor
to create a shape of any size. Pressing Shift while dragging constrains the shape to
equal height and width — for example, an exact square or circle. Pressing Option/Alt
while you drag creates the shape so that the center appears where you first click. In Shift-click and drag
the images to the right, the red dot identifies where we first clicked to create the new
shape; the yellow circle identifies the current location of the cursor.
You can also single-click using a basic shape tool to open a dialog box, where
you can define settings specific to the shape. In this case, the top-left corner of the
new shape will be positioned at the place where you click. Option/Alt-click and drag
In this exercise, you are going to draw a set of simple rectangles with rounded
corners to contain the icon artwork that you create throughout this project. We
introduce you to a number of techniques for creating these shapes so you can be
better aware of the options as you continue your professional career using Illustrator.
1. With icons.ai open, choose Window>Toolbars>Advanced.
This command shows the entire Illustrator toolset, including all nested variations.
Throughout this book, we assume you are using the Advanced Tools panel.
2. Click the Rectangle tool in the Tools panel and hold down the mouse
button until the nested tools appear. Choose the Rounded Rectangle tool
from the list of nested tools.
When you choose a nested tool, that variation becomes the
default option in the Tools panel. You don’t need to access the
nested menu to select the Rounded Rectangle tool again as long
as the application remains open.
3. Click the Default Fill and Stroke button at the bottom of the Tools panel.
In Illustrator, the default fill is white and the default stroke is 1-pt black. The button
appears in a slightly different location depending on whether your Tools panel is in
one- or two-column mode.
One-Column mode Two-Column mode Note:
Default Fill Swap Fill Swap Fill You can also press D to
and Stroke and Stroke Default Fill and Stroke restore the default fill
and Stroke
and stroke colors.
4. With the Rounded Rectangle tool active, click anywhere on the artboard.
In the case of the Rounded Rectangle tool, you can define
the size of the shape you want to create, as well as the The Width field is
corner radius. The default measurement system is points, highlighted when the
which you defined when you created this file. dialog box opens.
When the dialog box first opens, the Width field is
automatically highlighted. You can simply type to replace the highlighted value.
32 Project 1: Campground Icons