
Page 17 - CC2017_DW_Look_Inside
P. 17
PlAn Folder orgAnizAtion
When all files are dumped into the main site folder, it can be challenging to manage
your work. A well-organized site is an easy-to-manage site. Ideally, organization occurs
before the site is constructed, but Dreamweaver makes it easy to reorganize files and
folders at any point in the process.
There are no absolute rules to follow for organizing files and folders — other than
the general principle of keeping related components together, so you know where to
find certain files when you need them.
1. With the Kinetic site open in the Files panel, scroll to the top of the Files
panel (if necessary). Control/right-click the
site name and choose New Folder from the
contextual menu.
The basic pages (home, about, contact, etc.) form
the root of the site, and they should therefore appear
within the root folder of the site. Other pages are
better kept in folders that are named based on what they contain.
2. Type resources and press Return/Enter to apply the new folder name.
If the folder name remains untitled after pressing Return/Enter, Control/right-click the
untitled folder, choose Edit>Rename in the contextual menu (or press the F2 key), and
retype the new folder name.
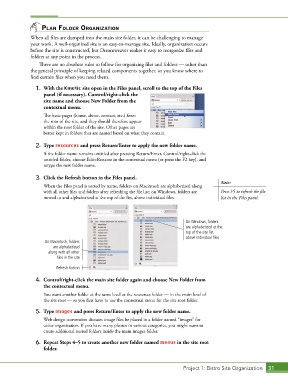
3. Click the Refresh button in the Files panel.
Note:
When the Files panel is sorted by name, folders on Macintosh are alphabetized along
with all other files and folders after refreshing the file list; on Windows, folders are Press F5 to refresh the file
moved to and alphabetized at the top of the list, above individual files. list in the Files panel.
On Windows, folders
are alphabetized at the
top of the site list,
above individual files.
On Macintosh, folders
are alphabetized
along with all other
files in the site.
Refresh button
4. Control/right-click the main site folder again and choose New Folder from
the contextual menu.
You want another folder at the same level as the resources folder — in the main level of
the site root — so you first have to use the contextual menu for the site root folder.
5. Type images and press Return/Enter to apply the new folder name.
Web design convention dictates image files be placed in a folder named “images” for
easier organization. If you have many photos in various categories, you might want to
create additional nested folders inside the main images folder.
6. Repeat Steps 4–5 to create another new folder named menus in the site root
folder.
Project 1: Bistro Site Organization 31