


Page 29 - CS6_PS_Look_Inside
P. 29
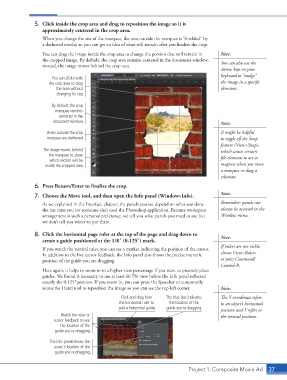
5.  Click inside the crop area and drag to reposition the image so it is
                        approximately centered in the crop area.
                        When you change the size of the marquee, the area outside the marquee is “shielded” by
                        a darkened overlay so you can get an idea of what will remain after you finalize the crop.
                        You can drag the image inside the crop area to change the portion that will remain in   Note:
                        the cropped image. By default, the crop area remains centered in the document window;   You can also use the
                        instead, the image moves behind the crop area.
                                                                                                 Arrow keys on your
                                                                                                 keyboard to “nudge”
                            You can click inside
                           the crop area to drag                                                 the image in a specific
                             the area without                                                    direction.
                              changing its size.

                            By default, the crop
                             marquee remains
                               centered in the
                            document window.                                                     Note:

                          Areas outside the crop                                                 It might be helpful
                          marquee are darkened.                                                  to toggle off the Snap
                                                                                                 feature (View>Snap),
                        The image moves behind                                                   which causes certain
                          the marquee to show                                                    file elements to act as
                           which section will be
                         inside the cropped area.                                                magnets when you move
                                                                                                 a marquee or drag a
                                                                                                 selection.
                    6.  Press Return/Enter to finalize the crop.

                    7.  Choose the Move tool, and then open the Info panel (Window>Info).        Note:
                        As we explained in the Interface chapter, the panels you see depend on what was done   Remember: panels can
                        the last time you (or someone else) used the Photoshop application. Because workspace   always be accessed in the
                        arrangement is such a personal preference, we tell you what panels you need to use but   Window menu.
                        we don’t tell you where to put them.

                    8.  Click the horizontal page ruler at the top of the page and drag down to   Note:
                        create a guide positioned at the 1/8″ (0.125″) mark.
                                                                                                 If rulers are not visble,
                        If you watch the vertical ruler, you can see a marker indicating the position of the cursor.
                        In addition to the live cursor feedback, the Info panel also shows the precise numeric   choose View>Rulers
                        position of the guide you are dragging.                                  or press Command/
                                                                                                 Control-R.
                        Here again, it helps to zoom in to a higher view percentage if you want to precisely place
                        guides. We found it necessary to use at least 66.7% view before the Info panel reflected
                        exactly the 0.125″position. If you zoom in, you can press the Spacebar to temporarily
                        access the Hand tool to reposition the image so you can see the top-left corner.  Note:

                                                        Click and drag from   The blue line indicates   The X coordinate refers
                                                       the horizontal ruler to   the location of the   to an object’s horizontal
                                                       add a horizontal guide.  guide you’re dragging.
                                                                                                 position and Y refers to
                               Watch the ruler or                                                the vertical position.
                             cursor feedback to see
                               the location of the
                             guide you’re dragging.

                           The Info panel shows the
                             exact Y location of the
                             guide you’re dragging.


                                                                                    Project 1: Composite Movie Ad   37

