


Page 22 - CS6_PS_Look_Inside
P. 22
resize tHe iMAge
               Every raster image has a defined, specific resolution that is established when the image
               is created. If you scan an image to be 3″ high by 3″ wide at 150 ppi, that image has
               450 pixels in each vertical column and 450 pixels in each horizontal row. Simply
               resizing the image stretches or compresses those pixels into a different physical space,
               but does not add or remove pixel information. If you resize the 3 × 3″ image to
               6 × 6″ (200% of the original), the 450 pixels in each column or row are forced to
               extend across 6″ instead of 3″, causing a marked loss of quality.
                  The effective resolution of an image is the resolution calculated after any scaling
               is taken into account. This number is equally important as the original image
               resolution — and perhaps moreso. The effective resolution can be calculated with a
               fairly simple equation:

                       Original resolution ÷ (% magnification ÷ 100) = Effective resolution

                  If a 300-ppi image is magnified 150%, the effective resolution is:

                       300 ppi ÷ 1.5 = 200 ppi

                  In other words, the more you enlarge a raster image, the lower its effective
               resolution becomes. In general, you can make an image 10% or 15% larger without
               significant adverse effects; the more you enlarge an image, however, the worse the
               results. Even Photoshop, which offers very sophisticated formulas (called “algorithms”)
               for sizing images, cannot guarantee perfect results.
                  Effective resolution can be a very important consideration when working with
               client-supplied images, especially those that come from consumer-level digital cameras.
               Many of those devices capture images with a specific number of pixels rather than
               a number of pixels per inch (ppi). In this exercise, you will explore the effective
               resolution of an image to see if it can be used for a full-page printed magazine ad.

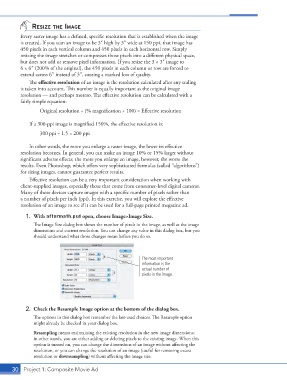
                 1.  With aftermath.psd open, choose Image>Image Size.
                    The Image Size dialog box shows the number of pixels in the image, as well as the image
                    dimensions and current resolution. You can change any value in this dialog box, but you
                    should understand what those changes mean before you do so.


                                                                 The most important
                                                                 information is the
                                                                 actual number of
                                                                 pixels in the image.


                 2.  Check the Resample Image option at the bottom of the dialog box.
                    The options in this dialog box remember the last-used choices. The Resample option
                    might already be checked in your dialog box.

                    Resampling means maintaining the existing resolution in the new image dimensions;
                    in other words, you are either adding or deleting pixels to the existing image. When this
                    option is turned on, you can change the dimensions of an image without affecting the
                    resolution, or you can change the resolution of an image (useful for removing excess
                    resolution or downsampling) without affecting the image size.

           30 Project 1: Composite Movie Ad

