


Page 52 - CC2019_PS_Look_Inside
P. 52
Th  e Select> Color Range menu command opens a dialog box that you can use to select areas of
              an image based on sampled colors.

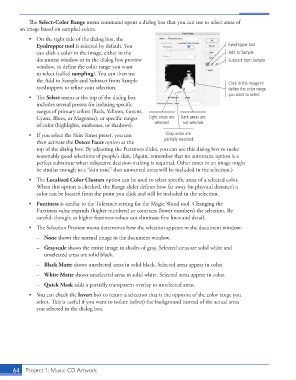
                 •  On the right side of the dialog box, the
                    Eyedropper tool is selected by default. You                               Eyedropper tool
                    can click a color in the image, either in the                             Add to Sample
                    document window or in the dialog box preview                              Subtract from Sample
                    window, to defi ne the color range you want
                    to select (called sampling). You can then use
                    the Add to Sample and Subtract from Sample                                Click in the image to
                    eyedroppers to refi ne your selection.                                    define the color range

                 •  Th  e Select menu at the top of the dialog box                            you want to select.
                    includes several presets for isolating specifi c
                    ranges of primary colors (Reds, Yellows, Greens,
                    Cyans, Blues, or Magentas), or specifi c ranges   Light areas are   Dark areas are
                    of color (highlights, midtones, or shadows).   selected.  not selected.

                 •  If you select the  Skin Tones preset, you can     Gray areas are
                    then activate the  Detect Faces option at the    partially selected.
                    top of the dialog box. By adjusting the Fuzziness slider, you can use this dialog box to make
                    reasonably good selections of people’s skin. (Again, remember that no automatic option is a
                    perfect substitute when subjective decision-making is required. Other tones in an image might
                    be similar enough to a “skin tone” that unwanted areas will be included in the selection.)
                 •  Th  e  Localized Color Clusters option can be used to select specifi c areas of a selected color.
                    When this option is checked, the Range slider defi nes how far away (in physical distance) a
                    color can be located from the point you click and still be included in the selection.
                 •   Fuzziness is similar to the  Tolerance setting for  the  Magic Wand tool. Changing the
                    Fuzziness value expands (higher numbers) or contracts (lower numbers) the selection. Be
                    careful, though, as higher fuzziness values can eliminate fi ne lines and detail.

                 •  Th  e  Selection Preview menu determines how the selection appears in the document window:
                    –  None shows the normal image in the document window.

                    –  Grayscale shows the entire image in shades of gray. Selected areas are solid white and
                       unselected areas are solid black.

                    –  Black Matte shows unselected areas in solid black. Selected areas appear in color.
                    –  White Matte shows unselected areas in solid white. Selected areas appear in color.
                    –  Quick Mask adds a partially transparent overlay to unselected areas.

                 •  You can check the  Invert box to return a selection that is the opposite of the color range you
                    select. Th  is is useful if you want to isolate (select) the background instead of the actual areas
                    you selected in the dialog box.


           64     Project 1: Music CD Artwork

