


Page 5 - CC2018_PS_Look_Inside
P. 5
Understanding Vector Path Operations Merge Shape Components
It is important to note that with the four Combine options
New Layer
When you first choose one of the vector drawing tools — explained to the left, the result is the appearance of a single
shape, but the original paths of each shape are maintained.
PHOTOSHOP FOUNDATIONS is active, every new path will be created on a separate layer. To make the interaction of overlapping shapes permanent, Photoshop Foundations
Pen, Freeform Pen, or one of the Shape tools — the Path
You can still select and manipulate each component path
Operations menu defaults to New Layer. When this option
independently.
you can select the paths you want to affect and choose
Merge Shape Components. This results in a single shape
that is the combination of any selected paths; unselected
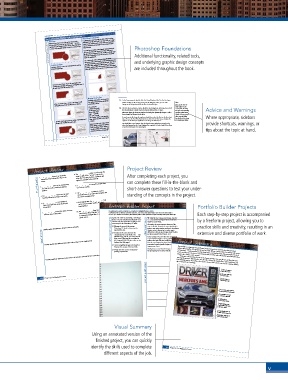
Additional functionality, related tools,
paths are not affected.
interaction of the selected paths. In the example below, the
top shape had been created with the Intersect Shape Areas
operation. After applying the Merge Shape Components
Combining Shapes The actual result of this command depends on the and underlying graphic design concepts
Combine Shapes creates the new path on the existing
operation, anchor points were removed where the original
(selected) shape layer. paths did not intersect (as you can see in the bottom image). are included throughout the book.
Subtract Front Shape creates the new path on the
existing (selected layer), and removes overlapping areas of
the new shape from the existing shape.
Merging Shape Layers
If multiple shape layers are selected in the Layers panel, you
Intersect Shape Areas results in the shape of only can combine them by choosing Merge Shapes in the Layers 15. In the Layers panel, double-click the Drop Shadow e ect for the Car layer. Note:
Double-clicking an e ect in the panel opens the dialog box, where you can make
panel Options menu.
overlapping areas in the existing and new shapes.
changes to the settings that de ne the e ect for the active layer.
If you double-click the
This command word “Eff ects” in the
combines the shapes 16. Click in the document window (behind the dialog box) and drag down until Layers panel, the dialog
on all selected layers the drop shadow is much more prominent behind the car layer. box opens to the Blending Advice and Warnings
into a single shape When you drag in the document window, the dialog box dynamically changes to re ect Options: Default screen.
layer — basically the new angle and distance for the e ect. Double-clicking a specifi c
the same as using
the Combine Shapes path operation. The new combined As you dynamically change the angle, you should also notice the e ect on the three Inset eff ect opens the dialog Where appropriate, sidebars
Exclude Overlapping Areas removes overlapping areas layer adopts the name of the highest layer in the previous layers. Because the Use Global Light option is checked for all four layers, changing the box directly to the settings provide shortcuts, warnings, or
for the eff ect you clicked.
selection.
angle for one of these layers applies the same change to all four layers.
Important note: Don’t confuse this Merge option with the
between the existing and new shapes.
You should also notice, however, that the altered Distance value does not apply to the
Merge Shape Components option in the Path Operations
menu. The Merge Shapes option in the Layers panel
other three layers where the Drop Shadow e ect is applied. Only the Angle of the e ects
actually combines the various shapes into a single layer, but is synchronized between the various layers.
maintains all of the existing paths.
Project 2: Car Magazine Cover 117 tips about the topic at hand.
Changing the angle for one effect Click and drag in the document
changes the angle for all effects window to dynamically change
that use the Global Light option.
the effect settings.
Project Review
Project Review 6. The _______________ option is used to link the 17. Change the size eld to 50 px, then click OK to apply the changed settings.
18. In the Layers panel, click the fx buttons to collapse the e ects for all layers.
1. _______________ sharpens an image by angle of styles to the “master” angle for the After completing each project, you
entire fi le. Changing it affects any linked style
increasing contrast along the edges in an
fi ll in the blank 2. _______________ refers to the overall image 7. A _______________ is a smooth transition from can complete these fill-in-the-blank and
applied to any layer in the entire fi le
image.
area, like the surface used by traditional
one color to another.
short-answer questions to test your under-
painters.
show only areas of one layer that fall within the
3. The _______________ tool is used to draw 8. The _______________ command is used to standing of the concepts in the project.
freeform vector-based shapes and paths. area of the underlying layer. 19. Save the le and continue to the next exercise.
4. A _______________ is a special type of 9. In the Liquify fi lter, the _______________ tool Project 2: Car Magazine Cover 133
can be used to protect specifi c areas from
Photoshop layer that retains vector path
information. being liquifi ed. Portfolio Builder Project Portfolio Builder Projects
5. _______________ control the shape of a curve 10. The _______________ allows you to experiment Use what you learned in this project to complete the following freeform exercise. Each step-by-step project is accompanied
with different fi lters and fi lter settings, and
to compound multiple fi lters to create unique Carefully read the art director and client comments, then create your own design to meet the needs of the project.
between two anchor points.
artistic effects. Use the space below to sketch ideas; when fi nished, write a brief explanation of your reasoning behind your fi nal design. by a freeform project, allowing you to
We really like the existing cover design, but after
Against e Clock is considering a new design
for the covers of its Professional Portfolio series
ve editions we’re starting to think a fresh look
of books. You have been hired to design a new
might be a good thing.
cover is the title. However, it seems that Adobe is
o Measure the cover of the existing
1. Briefl y explain the difference between vectors and pixels. art director comments cover comp for the Photoshop CC book. client comments Obviously, the most important element of the practice skills and creativity, resulting in an
Photoshop CC book to determine the
going to stop using version numbers in its software
required trim size.
releases, so we’re also going to need a way to
short answer o Incorporate the same elements that an edition number (2nd edition, etc.) extensive and diverse portfolio of work.
di erentiate editions; your design should include
currently appear on the book cover — title,
In the existing covers, we chose the cityscapes as
publisher logo, and the text in the bottom-
a representation of places where graphic design
right corner. ( e logo le is included in
the Covers_PS18_PB.zip archive on the
students nd jobs. We don’t really have any set
2. Briefl y describe two different tool modes when using a vector drawing tool.
Student Files Web page.)
connection between graphic design and the
o Create compelling images and artwork to
imagery you choose.
illustrate the concept of the book title. ideas for new imagery, but there should be some Project Summary
o Design the cover to meet commercial
Vectors o er an advantage over pixel-based images because they can be freely scaled and edited
printing requirements. Finally, keep in mind that the design should allow without losing quality. is project focused on many di erent options related to working with vectors
3. Briefl y explain the difference between the Path Selection tool and the Direct Selection tool. types of projects in Photoshop.
for repurposing for the other titles in the series. in Photoshop — drawing paths, creating shape layers, and editing vector shape properties. You used
images and a custom artistic pattern.
vectors in this project to create a custom layer mask, as well as vector shapes that you lled with other
is project also introduced some of the creative tools that can turn photos and at colors into
project justifi cation vector shape layer
painting-like artwork. You learned to use the Filter Gallery, the Liquify lter, custom gradients, and
layer blending modes. You will use these options many times in your career as you complete di erent
Create a compound
Edit corner properties
of vector shapes
152 Project 2: Car Magazine Cover Apply a style to a
vector shape layer
Use a vector mask to remove
an image from its background
Use gradients to create
a custom background
Liquify pixels to
create unique effects
Adjust blending mode
and opacity to blend one
layer into another
Create clipping masks to
153 isolate specific image areas
Apply filters to images to
create artistic effects
Visual Summary
Using an annotated version of the
finished project, you can quickly
identify the skills used to complete 154 Project 2: Car Magazine Cover
different aspects of the job.
v

