


Page 4 - CC2018_PS_Look_Inside
P. 4
Walk-Through
          Walk-Through


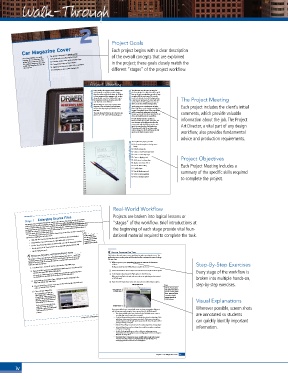
                                               Project Goals
          Car Magazine Cover                   Each project begins with a clear description
          Your client publishes a monthly   This project incorporates the following skills:  of the overall concepts that are explained
                      o  Resizing and resampling supplied images
          magazine for car enthusiasts. Your   o  Creating complex vector paths and shape layers
          agency has been hired to take over   in the project; these goals closely match the
           the magazine design; you have been   o  Compositing images as Smart Objects
                      o  Applying non-destructive styles, effects, and filters
           tasked with designing the cover for
           the next issue.  o  Developing a custom artistic background  different “stages” of the project workflow.
                                      Project Meeting    e client sent me the main car image for
                                        Every month, the magazine cover includes one
                                       client comments  main featured car, and three smaller images   art director comments  the  rst redesign. It’s a little bit small, so we’ll   The Project Meeting
                                        related to other articles in the issue. In addition
                                                       have to do some manipulation to make it large
                                        to those images and the magazine title, we also
                                                       enough to  ll the cover space.   e car also
                                                       needs to be knocked out of its background so
                                        always include several text blurbs with teasers
                                        for secondary articles in the issue, and a QR
                                                       it can be more prominent. A vector path will
                                        code that links to the Web site.
                                                       work well to meet this goal because you can
                                        We’re looking for a new way to present these
                                                       You’re going to use a combination of styles,
                                        elements. Once we  nalize a general layout,
                                                        lters, and e ects on the background and inset
                                        we’ll use that layout going forward for every   edit it at any time without losing quality.   Each project includes the client’s initial
                                        new issue.     images. Photoshop’s Smart Object capabilities
                                          e only thing we’re  xed on in is the trim size,   will be a signi cant advantage in this task   comments, which provide valuable
                                                       because we can edit the e ects and  lters if the
                                        which is 8″ × 10″ with 1/8″ bleed allowance.
                                                       client isn’t thrilled with the initial e ort.
                                                       I’ve also already created a template in   information about the job. The Project
                                                       Illustrator with the magazine nameplate and
                                                       text elements; we’ll repurpose the same  le
                                                       every month with the di erent text for each   Art Director, a vital part of any design
                                                       issue. You can place that  le directly into
                                                       Photoshop as a linked  le so that any last-
                                                       minute changes in the  le will automatically
                                                       appear in the  nal composite cover.  workflow, also provides fundamental
                                                                            advice and production requirements.
                                                       project objectives  o  Resize and resample an existing source
                                                       To complete this project, you will:
                                                        image
                                                       o  Edit the canvas size
                                                       o  Create a vector-based layer mask
                                                       o  Create a vector shape layer
                                                       o  Create a clipping mask
                                                       o  Add texture to a shape layer
                                                       o  Apply custom layer e ects  Project Objectives
                                                       o  Use the Filter Gallery  Each Project Meeting includes a
                                                       o  Liquify a layer
                                                       o  Use the Eyedropper tool  summary of the specific skills required
                                                       o  Create a custom gradient
                                                       o  Print a composite proof
                                                                            to complete the project.
                                                Real-World Workflow
           Stage 1   Enlarging Source Files     Projects are broken into logical lessons or
           Any project that you build in Photoshop requires some amount of zooming in and out to various
                                                “stages” of the workflow. Brief introductions at
           view percentages, as well as navigating around the document within its window. As we show you
           how to complete different stages of the workflow, we usually won’t tell you when to change your view
            percentage because that’s largely a matter of personal preference. Nonetheless, you should understand
            the different options for navigating around a Photoshop file so you can easily and efficiently get to
             To review information from the Interface chapter, keep in mind that you have a number of
            what you want, when you want to get there.
                                                dational material required to complete the task.
                                    As you complete the
            options for navigating around a document:  Note:  the beginning of each stage provide vital foun-
             •  Click with the Hand tool to drag the image around in the document window.
                                    exercises in this project,
                                    use any of these methods
             •  Click with the Zoom tool to zoom in; Option/Alt-click to zoom out.  to zoom in or out on
             •  Use the View Percentage field in the bottom-left corner of the document window.
                                    different areas of the file.
             •  Use the options in the View menu (or the corresponding keyboard shortcuts).
             •  Use the Navigator panel.       Use the FreeForm Pen tool
              Resize and Resample the existing souRce image
             This project — like many others you will build throughout your career — starts with   The Freeform Pen tool creates a vector path based on where you drag the cursor. The
             an existing image, which you will open and use as the basis for the rest of the project.
                                              application creates anchor points and direction handles as necessary to create the shape
             Whenever you start with an existing file, it’s best to evaluate what you already have
                                              that you draw.
             before you make any changes.       1.  With magazine.psd open, show the image at 100% in the document   Step-By-Step Exercises
               1.  Download Cars_PS18_RF.zip from the Student Files Web page.  Ideally, you should work at 100% while you complete this exercise.
                                               window.
               2.  Expand the ZIP archive in your WIP folder (Macintosh) or copy the archive     2.  Choose the Freeform Pen tool (nested under the Pen tool) in the Tools panel.  Every stage of the workflow is
               contents into your WIP folder (Windows).
               This results in a folder named Cars, which contains the files you need for this project.
               You should also use this folder to save the files you create in this project.
                                                3.  In the Options bar, choose the Path option in the left menu.
               3.  In Photoshop, choose File>Open. Navigate to the file amg.jpg in the   When you choose Path in the tool mode menu, the vector path that you draw is stored   broken into multiple hands-on,
                                               in the Paths panel.
               WIP>Cars folder and click Open.
                4.  Choose View>Fit on Screen so you can see the entire image, and make sure     4.  Open the Path Operations menu and choose the Combine Shapes option.  Note:  step-by-step exercises.
                                                        Path Operations menu
               rulers are visible (View>Rulers).
                                                                     only applies if you have a
                5.  Choose Image>Image Size.   Choose Path in the    The Pen Pressure option
                                                Tool Mode menu.
                                                                     pressure-sensitive graphics
               The amg.jpg file is 253 wide by                       tablet. When this option
                18.753 high, with a resolution of                    is turned on, higher
                72 pixels/inch. Commercial printing                  pressure decreases the
                typically requires 300 pixels/inch, so
                this image would not be considered                   Width tolerance.  Visual Explanations
                “print quality” at its current size.
                The first step is to resize the image
                using the principle of effective   Freeform Pen tool              Wherever possible, screen shots
                resolution to achieve the 300 pixels/
                inch required for commercial   These options define how a new path will interact with any existing paths. (Illustrator
                printing.                      and InDesign users might recognize these as options from the Pathfinder panel.)  are annotated so students
                                                •  New Layer, available when Layer is selected in the Tool Mode menu, creates a
                                                 new shape layer every time you draw a new path.
                                   Project 2: Car Magazine Cover  91  •  Combine Shapes adds new paths to an already selected path or shape layer. Each
                                                 path’s shape is maintained as a separate vector path. If you want a new path to   can quickly identify important
                                                 include only areas inside the path you draw, you should choose this option before
                                                 you begin drawing a new path.
                                                •  Subtract Front Shape removes the area of secondary shapes from existing shapes.
                                                •  Intersect Shape Areas results in a shape that is only the area where a new shape   information.
                                                 overlaps an existing shape.
                                                •  Exclude Overlapping Shapes is similar to Subtract; overlapping areas are
                                                 removed from the existing shape, but non-overlapping areas of the new shape are
                                                 filled with the shape color.
                                                •  The Merge Shape Components option, available when a single path contains
                                                 more than one shape, results in a single (possibly compound) shape. Any
                                                 overlapping paths are combined into one shape/path.
                                                                 Project 2: Car Magazine Cover  99
       iv

