


Page 42 - CC2018_PS_Look_Inside
P. 42
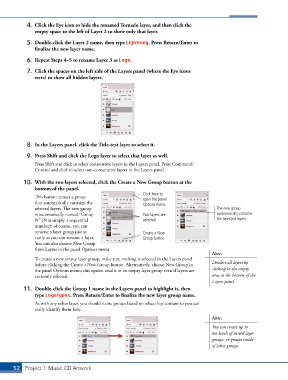
4.  Click the Eye icon to hide the renamed Tornado layer, and then click the
               empty space to the left of Layer 2 to show only that layer.

            5.  Double-click the Layer 2 name, then type Lightning. Press Return/Enter to
               finalize the new layer name.

            6.  Repeat Steps 4–5 to rename Layer 3 as Logo.

            7.  Click the spaces on the left side of the Layers panel (where the Eye icons
               were) to show all hidden layers.


            8.  In the Layers panel, click the Title-text layer to select it.

            9.  Press Shift and click the Logo layer to select that layer as well.

               Press Shift and click to select consecutive layers in the Layers panel. Press Command/
               Control and click to select non-consecutive layers in the Layers panel.

           10.  With the two layers selected, click the Create a New Group button at the
               bottom of the panel.
                                                            Click here to
               This button creates a group                  open the panel
               that automatically contains the              Options menu.
               selected layers. The new group                                             The new group
               is automatically named “Group                Two layers are                automatically contains
               N” (N is simply a sequential                 selected.                     the selected layers.
               number); of course, you can
               rename a layer group just as                 Create a New
               easily as you can rename a layer.            Group button
               You can also choose New Group
               from Layers in the panel Options menu.
                                                                                        Note:
               To create a new empty layer group, make sure nothing is selected in the Layers panel
               before clicking the Create a New Group button. Alternatively, choose New Group in   Deselect all layers by
               the panel Options menu; this option results in an empty layer group even if layers are   clicking in the empty
               currently selected.                                                      area at the bottom of the
                                                                                        Layers panel.
           11.  Double-click the Group 1 name in the Layers panel to highlight it, then
               type Logotypes. Press Return/Enter to finalize the new layer group name.
               As with any other layer, you should name groups based on what they contain so you can
               easily identify them later.
                                                                                        Note:
                                                                                        You can create up to
                                                                                        ten levels of nested layer
                                                                                        groups, or groups inside
                                                                                        of other groups.


       52 Project 1: Music CD Artwork

