


Page 35 - CC2017_AI_Look_Inside
P. 35
imPort temPlAte imAges
              Many Illustrator projects require you to start with something that has already been
              captured — a sketch, photograph, or low-resolution image (which is the case in this
              project). In this exercise you will place existing digital files to use as templates for your
              new artwork.
                1.  With icons.ai open, choose File>Place. Navigate to your WIP>Camping
                   folder and click picnic.jpg to select that file.

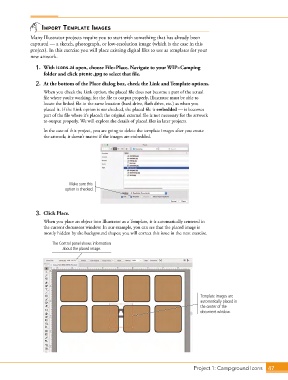
                2.  At the bottom of the Place dialog box, check the Link and Template options.
                   When you check the Link option, the placed file does not become a part of the actual
                   file where you’re working; for the file to output properly, Illustrator must be able to
                   locate the linked file in the same location (hard drive, flash drive, etc.) as when you
                   placed it. If the Link option is not checked, the placed file is embedded — it becomes
                   part of the file where it’s placed; the original external file is not necessary for the artwork
                   to output properly. We will explore the details of placed files in later projects.

                   In the case of this project, you are going to delete the template images after you create
                   the artwork; it doesn’t matter if the images are embedded.


                              Make sure this
                            option is checked.


                3.  Click Place.
                   When you place an object into Illustrator as a Template, it is automatically centered in
                   the current document window. In our example, you can see that the placed image is
                   mostly hidden by the background shapes; you will correct this issue in the next exercise.

                       The Control panel shows information
                           about the placed image.


                                                                                    Template images are
                                                                                    automatically placed in
                                                                                    the center of the
                                                                                    document window.


                                                                                 Project 1: Campground Icons    47

