


Page 42 - CC 2019 WD Look Inside
P. 42
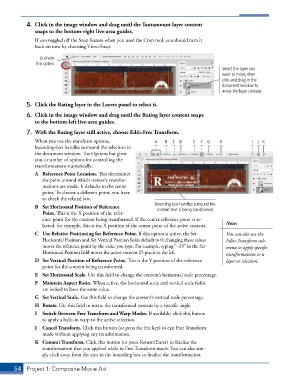
4.  Click in the image window and drag until the Tantamount layer content
              snaps to the bottom-right live-area guides.
               If you toggled off the Snap feature when you used the Crop tool, you should turn it
               back on now by choosing View>Snap.

                Uncheck
               this option.
                                                                                       Select the layer you
                                                                                       want to move, then
                                                                                       click and drag in the
                                                                                       document window to
                                                                                       move the layer content.

           5.  Click the Rating layer in the Layers panel to select it.

           6.  Click in the image window and drag until the Rating layer content snaps
              to the bottom-left live-area guides.

           7.  With the Rating layer still active, choose Edit>Free Transform.
               When you use the transform options,           A   B  C  D   E  F  G    H           I  J K
               bounding-box handles surround the selection in
               the document window. The Options bar gives
               you a number of options for controlling the
               transformations numerically:
               A  Reference Point Location. This determines
                 the point around which numeric transfor-
                 mations are made. It defaults to the center
                 point. To choose a different point, you have
                 to check the related box.
                                                             Bounding-box handles surround the
               B  Set Horizontal Position of Reference       content that is being transformed.
                 Point. This is the X position of the refer-
                 ence point for the content being transformed. If the center reference point is se-
                 lected, for example, this is the X position of the center point of the active content.  Note:
               C  Use Relative Positioning for Reference Point. If this option is active, the Set   You can also use the
                 Horizontal Position and Set Vertical Position fields default to 0; changing these values   Edit>Transform sub-
                 moves the reference point by the value you type. For example, typing “–25” in the Set   menu to apply specific
                 Horizontal Posi tion field moves the active content 25 pixels to the left.  transformations to a
               D  Set Vertical Position of Reference Point. This is the Y position of the reference   layer or selection.
                 point for the content being transformed.
               E  Set Horizontal Scale. Use this field to change the content’s horizontal scale percentage.
               F  Maintain Aspect Ratio. When active, the horizontal scale and vertical scale fields
                 are locked to have the same value.
               G  Set Vertical Scale. Use this field to change the content’s vertical scale percentage.
               H  Rotate. Use this field to rotate the transformed content by a specific angle.
               I  Switch Between Free Transform and Warp Modes. If available, click this button
                 to apply a built-in warp to the active selection.
               J  Cancel Transform. Click this button (or press the Esc key) to exit Free Transform
                 mode without applying any transformation.
               K  Commit Transform. Click this button (or press Return/Enter) to finalize the
                 transformation that you applied while in Free Transform mode. You can also sim-
                 ply click away from the area in the bounding box to finalize the transformation.


       54  Project 1: Composite Movie Ad

