


Page 5 - CC2018_GD_Look_Inside
P. 5
Entering Special Characters in Dialog Boxes Code (Metacharacters) Design Foundations
You can enter special characters in InDesign dialog boxes using the following special codes, called metacharacters.
(Note that these metacharacters are case specific; for example, “^n” and “^N” refer to different special characters.)
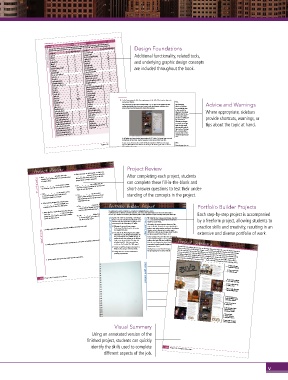
InDesIgn FounDatIons Character ^8 ^^ ^2 ^e Break Characters ^p ^n ^M ^R ^P Additional functionality, related tools,
Character
Code (Metacharacters)
Paragraph return
Symbols
Forced line break (soft return)
Bullet (•)
Column break
Caret (^)
and underlying graphic design concepts
Frame break
Copyright (©)
Ellipsis (…)
Odd page break
Paragraph
Even page break
Registered Trademark (®) ^7 ^r ^6 Page break ^L ^E ^j are included throughout the book.
Discretionary line break
Section (§) ^d Formatting Options
Trademark (™) ^t
Dashes and Hyphens ^_ Tab character ^y
Right indent tab character
Em Dash (—) ^= Indent to here character ^i
En Dash (–) ^- End nested style here character ^h
Discretionary hyphen ^~ ^k
Nonbreaking hyphen Nonjoiner character
White Space Characters ^m Variables ^Y
Running header (paragraph style)
Em space ^> Running header (character style) ^Z
En space ^3 Custom text ^u
Third space ^4 Last page number ^T
Quarter space ^% ^H
Sixth space ^f Chapter number ^S
Creation date
Flush space ^| (pipe) Modification date ^o
Hair space ^s ^D 9. In the Layers panel, click the empty space to the left of the top two layers to
Nonbreaking space ^< Output date ^l (lowercase L) make them visible. Note:
Thin space ^/ File name These two layers are type layers, identified with a “T” in place of the thumbnail. After Type formatting Advice and Warnings
Figure space ^. Markers ^x making them visible, you can see one is used to add visual interest, while the other options in Photoshop
presents important information (the client’s Web address).
Punctuation space Section marker ^a are essentially the same
Quotation Marks ^{ Anchored object marker ^F as those available in Where appropriate, sidebars
Illustrator. The primary
Footnote reference marker
Double left quotation mark ^} ^I difference, however, is
Double right quotation mark ^[ Index marker that each type “object”
Single left quotation mark ^] Wildcards ^9 (to relate it to Illustrator’s provide shortcuts, warnings, or
Single right quotation mark ^” Any digit ^$ type treatment) in
Straight double quotation mark ^’ Any letter ^? Photoshop is managed
Straight single quotation mark Any character ^w on separate, special type tips about the topic at hand.
Page Number Characters ^# White space (any space or tab) ^v layers. In other words,
Any page number character ^N Any variable when you click with the
Current page number character ^X Type tool in a Photoshop
file, a new type layer is
Next page number character ^V automatically created to
Previous page number character contain the type that you
enter.
In InDesign, you know that the layout requires 0.125 bleeds. The image frame correctly
extends into the bleed area, and the image was created to match the frame size.
581
Project 10: Combined Brochure As you can see, the artist who created the file placed guides 0.125 from each image Note:
edge. The Web address at the bottom sits directly on the bottom guide and is centered
horizontally on the canvas. Photoshop type layers are
automatically named
However, based on its position in the InDesign layout, the top, bottom, and left edges based on their content.
of the image will be trimmed from the page. This means the position of the Web address
is incorrect in the context of the greater layout where it is placed. You need to move it
up and right to appear in the correct location within the trim area instead of the overall
image area. (This is a common problem in placed image files.)
10. Select the web address layer in the Layers panel and make the Move tool
active. Turn off the Auto-Select option in the Options bar.
It can be difficult to actually click the pixels in this thin type, so it is easier to move the
layer by manually selecting it and turning off the Auto-Select option.
Project Review
Project Review 6. When you place an InDesign file as a link, the 11. Click in the canvas area and drag to move the Web address layer content so Note:
it snaps to the right guide and there is approximately 1/8 space between the
After completing each project, students
1. A(n) _______________ describes the color _______________ option in the Place InDesign bottom edge of the type and the bottom guide. You might want to zoom
Auto-Select is
dialog box determines which area of the file
reproduction characteristics of a particular input
in to make this easier.
turned off.
fill in the blank 2. The _______________ can be used to review 7. The _______________ lists all files that are type layer is selected.
(page, bleed, or slug) is imported.
The Move
or output device.
can complete these fill-in-the-blank and
tool is active.
placed in a layout, including the location and
the location of specific spot colors in a layout.
short-answer questions to test their under-
The Web address
status of each placed file.
3. A(n) _______________ can be used to create
standing of the concepts in the project.
content up and right.
a smooth transition from solid pixels to 8. The _______________ can be used to Drag to move the layer
define custom spellings that are not in the
transparent pixels in an image. main dictionary, such as proper names or
4. When placing images into a layout, press trademarked terms. Project 10: Combined Brochure 569
_______________ to select multiple, non- 9. The _______________ shows the basic text in
contiguous files in the Place dialog box. a story, without applied formatting; it can be Portfolio Builder Project Portfolio Builder Projects
5. When placing a native Photoshop file, you can used to review tracked changes. Use what you learned in this project to complete the following freeform exercise.
check the _______________ option in the Place
dialog box to be able to control layer visibility 10. The _______________ dialog box can be used Carefully read the art director and client comments, then create your own design to meet the needs of the project. Each step-by-step project is accompanied
to convert specific spot colors to process while Use the space below to sketch ideas; when finished, write a brief explanation of your reasoning behind your final design.
before the file is placed. the file is being output. Against The Clock is considering a new design We really like the existing cover design, but after by a freeform project, allowing students to
for the covers of its Professional Portfolio series
five editions we’re starting to think a fresh look
of books. You have been hired to design a new
might be a good thing.
o Measure the cover of your existing
1. Briefly explain the difference between additive and subtractive color. art director comments cover comp for the Photoshop CC book. client comments Obviously, the most important element of the practice skills and creativity, resulting in an
cover is the title. However, it seems that Adobe is
Professional Portfolio book to determine
going to stop using version numbers in its software
the required trim size.
releases, so we’re also going to need a way to
short answer o The title of the Photoshop book is Adobe an edition number (2nd edition, etc.) extensive and diverse portfolio of work.
differentiate editions; your design should include
Photoshop CC: The Professional Portfolio. Be
In the existing covers, we chose the cityscapes as
sure to incorporate the publisher’s logo, as
well as the text that appears on the bottom-
a representation of places where graphic design
2. Briefly explain the concept of color management, as it relates to building a layout in InDesign.
right corner of your book. (The logo file
students find jobs. We don’t really have any set
is in the PrintCC_PB_Project5.zip
connection between graphic design and the
archive on the Student Files Web page.)
imagery you choose.
o Create compelling images and artwork to ideas for new imagery, but there should be some Project Summary
illustrate the concept of the book title. As you have seen, placing pictures into an InDesign layout is a relatively easy task, whether you place
o Design the cover to meet commercial Finally, keep in mind that the design should allow them one at a time or load multiple images at once and then simply click to place the loaded images
printing requirements. for repurposing for the other titles in the series. into the appropriate spots. InDesign allows you to work with all of the common image formats;
3. Briefly explain how spot colors relate to print separations. external file in its native application so you can easily make changes in placed files. Fine-tuning a
you can even place one InDesign layout directly into another. The Links panel is a valuable tool for
managing images, from updating file status, to replacing one image with another, to opening an
layout requires checking for common errors — both technical and practical, such as spelling errors.
project justification an Alpha channel
Edit placed images
using the Links panel
Place a TIFF file with
596 Project 10: Combined Brochure Load and place multiple
JPEG images at one time
Place a native InDesign
layout as a link
Place a native Photoshop
file with multiple layers
Find and replace text,
with and without specific
formatting attributes
Check for and correct
spelling errors
Find and replace layout
objects with specific
formatting attributes
315
Track and verify
changes during the
development process
Export a color-managed
PDF file with a spot color
Visual Summary
Using an annotated version of the
finished project, students can quickly
identify the skills used to complete 598 Project 10: Combined Brochure
different aspects of the job.
v

