


Page 4 - CC2018_GD_Look_Inside
P. 4
Walk-Through
Walk-Through
10
project
Combined Brochure Project Goals
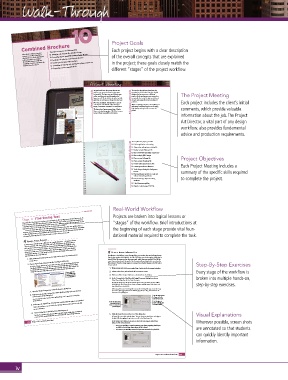
Each project begins with a clear description
This project incorporates the following skills:
Your client is trying to promote o Managing color in layout files and placed images
tourism in a newly redeveloped o Controlling import options for a variety of image file types of the overall concepts that are explained
downtown area. As the production o Searching and replacing text and special characters
artist, your job is to complete
the brochure layout, verify that o Searching and changing object attributes in the project; these goals closely match the
everything is correct, and create the o Controlling the language and checking the spelling in layout text
final file for print output.
o Outputting a color-managed PDF file different “stages” of the project workflow.
Project Meeting The text has already been placed into the
We just heard from the printer that we can
client comments only use one spot color based on the quote art director comments template for this brochure, but the original The Project Meeting
designer had to move on to a different
he provided. The logo uses two different spot
colors, and those are used throughout the
project. As the production artist, your job is
layout as well. We decided to keep the metallic
to assemble the rest of the pieces, and check
gold, but we need you to change the other one.
the text and images for errors or technical
Each project includes the client’s initial
problems.
Now that it’s official, we’d also like to use the
actual name “The BLVD” rather than just
will export a color-managed PDF file using
saying “Downtown Lancaster” in most places.
high-quality settings for the commercial
We have a lot of great pictures from Charlie When everything is in place and verified, you comments, which provide valuable
printer.
Essers, a local photographer. We’d like to use as
many of those as possible in the layout.
information about the job. The Project
Art Director, a vital part of any design
workflow, also provides fundamental
advice and production requirements.
To complete this project, you will:
project objectives o Define application color settings
o Assign color settings to an existing file
o Replace a native Illustrator file
o Place a TIFF file with Alpha transparency
o Place multiple JPEG images
o Place a native InDesign file
o Place a native Photoshop file Project Objectives
o Preview color separations in a file Each Project Meeting includes a
o Convert spot color in Illustrator
o Track changes during the development
process summary of the specific skills required
o Find and change specific text, with and
without formatting attributes
o Find and change object formatting to complete the project.
attributes
o Check document spelling
o Export a color-managed PDF file
Real-World Workflow
Stage 3 Fine-tuning Text Projects are broken into logical lessons or
Now that all of the images are in place, you can begin the fine-tuning process for the layout text. As
your art director informed you during the project meeting, some of the text work had already been
“stages” of the workflow. Brief introductions at
completed before the original designer had to move onto a different project. Your assignment in this
stage of the project is to verify that all text in the document is correct.
Some text issues have little to do with typography and more to do with “user malfunction” —
common errors introduced by the people who created the text (most often, your clients). Regardless the beginning of each stage provide vital foun-
of how careful you are, some problems will inevitably creep into the text elements of your layouts.
Fortunately, InDesign has the tools you need to correct those issues as well.
dational material required to complete the task.
EnablE Track changEs
In many cases, multiple users collaborate on a single document — designers, editors,
content providers, and clients all go back and forth throughout the design process.
Each person in the process will request changes, from changing the highlight color
in a document to rewriting the copy to fit in a defined space. Because the words in a
design are a vital part of communicating the client’s message, tracking text changes
throughout the process can be useful to make sure that all changes are accurate and
Place a Native iNDesigN File
approved before the job is finalized.
1. With boulevard.indd open, use the Type tool to place the insertion point In addition to the different types of image files, you can also place one InDesign layout
directly into another InDesign file. As with PDF files, you can determine which page is
placed (if the file contains more than one page), which layers are visible (if the file has
in any story.
2. Choose Type>Track Changes>Enable Tracking in All Stories. more than one layer), and the specific file dimensions (bounding box) to use when the Step-By-Step Exercises
The Track Changes feature can be activated to monitor text editing during development.
file is placed. Placed InDesign pages are managed as individual objects in the file where
This allows multiple users to edit the text without permanently altering that text until
they are placed.
the changes have been reviewed and approved or rejected. (After you have made all the
changes in this stage of the project, you will review and finalize those changes.)
2. Choose File>Place, and select the file invitation.indd.
These options are
not available unless 1. With boulevard.indd open, make Page 4 active in the document window. Every stage of the workflow is
the insertion point 3. Make sure Show Import Options is checked, then click Open.
is currently placed.
4. In the General tab of the Place InDesign Document dialog box, choose broken into multiple hands-on,
Bleed Bounding Box in the Crop To menu.
By default, the first page in the selected file appears as the previewed page that will be
loaded into the Place cursor. If you choose to import multiple pages at one time, each step-by-step exercises.
page is loaded as a separate file.
3. Open the Track Changes pane of the Preferences dialog box. When you place a native InDesign file into another InDesign file, you can use the Crop
4. Make sure the Include Deleted Text Wehn Spellchecking option is checked
To menu to place pages based on the defined page, bleed, or slug, as described in the
Document Setup dialog box.
It is very easy to make a mistake when spellchecking, so it’s a good idea to keep this
at the bottom of the dialog box.
Use this option to load
into the Place cursor.
option checked.
5. Make sure the Added Text, Deleted Text, and Moved Text options are checked. If a file has more than all pages in the file
Use this option to
Remember, preferences are accessed in the InDesign menu on Macintosh or in the Edit
import a specific page
one page, use these
or range of pages.
buttons to change the
previewed page.
menu on Windows.
6. Choose Underline in the Added Text Marking menu. 5. Click the Layers button at the top of the dialog box. Visual Explanations
The Marking options add a visual indicator (strikethrough, underlining, or outlining)
so you can more easily identify text that is affected by the Track Changes function.
InDesign files can include multiple layers. You can determine which layers to display in
the placed file by toggling the eye icons on or off in the Show Layers list.
576 Project 10: Combined Brochure In the Update Link Options menu, you can determine what happens when/if you Wherever possible, screen shots
update the link to the placed file.
• Keep Layer Visibility Overrides maintains your choices regarding which layers
are visible in the InDesign layout where the file is placed. are annotated so that students
• Use PDF’s Layer Visibility restores the layer status as saved in the placed file.
can quickly identify important
information.
Project 10: Combined Brochure 563
iv

