


Page 22 - CC2018_GD_Look_Inside
P. 22
9.  Click the Rounded Rectangle tool in the Tools panel and hold down the
               mouse button until the nested tools appear. Choose the Rectangle tool from
               the list of nested tools.


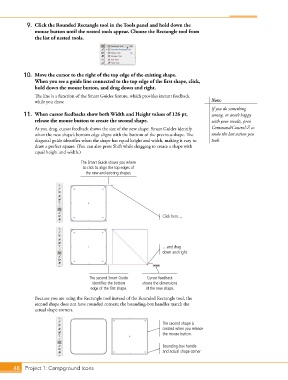
           10.  Move the cursor to the right of the top edge of the existing shape.
               When you see a guide line connected to the top edge of the first shape, click,
               hold down the mouse button, and drag down and right.
               The line is a function of the Smart Guides feature, which provides instant feedback
               while you draw.                                                          Note:
                                                                                        If you do something
           11.  When cursor feedbacks show both Width and Height values of 126 pt,      wrong, or aren’t happy
               release the mouse button to create the second shape.                     with your results, press
               As you drag, cursor feedback shows the size of the new shape. Smart Guides identify   Command/Control-Z to
               when the new shape’s bottom edge aligns with the bottom of the previous shape. The   undo the last action you
               diagonal guide identifies when the shape has equal height and width, making it easy to   took.
               draw a perfect square. (You can also press Shift while dragging to create a shape with
               equal height and width.)

                                  The Smart Guide shows you where
                                   to click to align the top edges of
                                    the new and existing shapes.


                                                                    Click here…


                                                                    …and drag
                                                                    down and right.


                                      The second Smart Guide   Cursor feedback
                                       identifies the bottom   shows the dimensions
                                      edge of the first shape.  of the new shape.
               Because you are using the Rectangle tool instead of the Rounded Rectangle tool, the
               second shape does not have rounded corners; the bounding-box handles match the
               actual shape corners.


                                                                    The second shape is
                                                                    created when you release
                                                                    the mouse button.

                                                                    Bounding-box handle
                                                                    and actual shape corner


       48 Project 1: Campground Icons

