


Page 16 - CC2018_GD_Look_Inside
P. 16
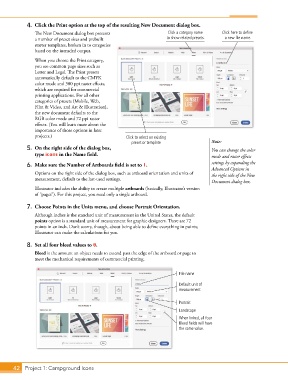
4.  Click the Print option at the top of the resulting New Document dialog box.
               The New Document dialog box presents                   Click a category name   Click here to define
               a number of preset sizes and prebuilt                  to show related presets.  a new file name.
               starter templates, broken in to categories
               based on the intended output.

               When you choose the Print category,
               you see common page sizes such as
               Letter and Legal. The Print presets
               automatically default to the CMYK
               color mode and 300 ppi raster effects,
               which are required for commercial
               printing applications. For all other
               categories of presets (Mobile, Web,
               Film & Video, and Art & Illustration),
               the new document defaults to the
               RGB color mode and 72 ppi raster
               effects. (You will learn more about the
               importance of those options in later
               projects.)                            Click to select an existing
                                                       preset or template.              Note:
            5.  On the right side of the dialog box,                                    You can change the color
               type icons in the Name field.                                            mode and raster effects

            6.  Make sure the Number of Artboards field is set to 1.                    settings by expanding the
                                                                                        Advanced Options in
               Options on the right side of the dialog box, such as artboard orientation and units of   the right side of the New
               measurement, default to the last-used settings.
                                                                                        Document dialog box.
               Illustrator includes the ability to create multiple artboards (basically, Illustrator’s version
               of “pages”). For this project, you need only a single artboard.

            7.  Choose Points in the Units menu, and choose Portrait Orientation.

               Although inches is the standard unit of measurement in the United States, the default
               points option is a standard unit of measurement for graphic designers. There are 72
               points in an inch. Don’t worry, though, about being able to define everything in points;
               Illustrator can make the calculations for you.

            8.  Set all four bleed values to 0.
               Bleed is the amount an object needs to extend past the edge of the artboard or page to
               meet the mechanical requirements of commercial printing.


                                                                           File name
                                                                           Default unit of
                                                                           measurement

                                                                           Portrait
                                                                           Landscape
                                                                           When linked, all four
                                                                           Bleed fields will have
                                                                           the same value.


       42 Project 1: Campground Icons

