
Page 26 - Adobe Graphic Design CC 2020
P. 26
Control Fill and Stroke Attributes
At the beginning of the previous exercise, you clicked the Default Fill and Stroke
button in the Tools panel to apply a white fill and 1-pt black stroke to the objects you
created. Obviously, most artwork requires more than these basic attributes.
As you complete the projects in this book, you will learn about styles, patterns,
gradients, effects, and other attributes that can take an illustration from flat to
fabulous. In this exercise, you learn about a number of options for changing the
basic fill, stroke, and color attributes for objects on the page.
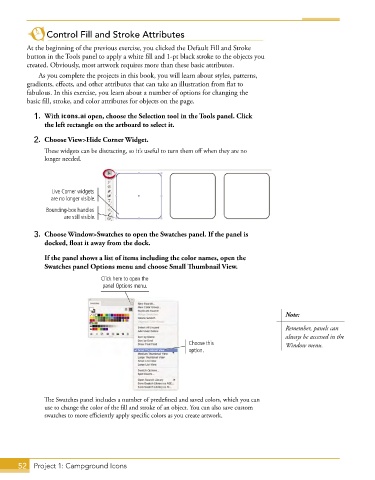
1. With icons.ai open, choose the Selection tool in the Tools panel. Click
the left rectangle on the artboard to select it.
2. Choose View>Hide Corner Widget.
These widgets can be distracting, so it’s useful to turn them off when they are no
longer needed.
Live Corner widgets
are no longer visible.
Bounding-box handles
are still visible.
3. Choose Window>Swatches to open the Swatches panel. If the panel is
docked, float it away from the dock.
If the panel shows a list of items including the color names, open the
Swatches panel Options menu and choose Small Thumbnail View.
Click here to open the
panel Options menu.
Note:
Remember, panels can
always be accessed in the
Choose this Window menu.
option.
The Swatches panel includes a number of predefined and saved colors, which you can
use to change the color of the fill and stroke of an object. You can also save custom
swatches to more efficiently apply specific colors as you create artwork.
52 Project 1: Campground Icons