


Page 16 - CC2018_PS_Look_Inside
P. 16
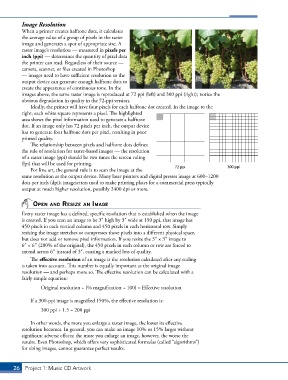
Image Resolution
          When a printer creates halftone dots, it calculates
          the average value of a group of pixels in the raster
          image and generates a spot of appropriate size. A
          raster image’s resolution — measured in pixels per
          inch (ppi) — determines the quantity of pixel data
          the printer can read. Regardless of their source —
          camera, scanner, or files created in Photoshop
          — images need to have sufficient resolution so the
          output device can generate enough halftone dots to
          create the appearance of continuous tone. In the
          images above, the same raster image is reproduced at 72 ppi (left) and 300 ppi (right); notice the
          obvious degradation in quality in the 72-ppi version.
              Ideally, the printer will have four pixels for each halftone dot created. In the image to the
          right, each white square represents a pixel. The highlighted
          area shows the pixel information used to generate a halftone
          dot. If an image only has 72 pixels per inch, the output device
          has to generate four halftone dots per pixel, resulting in poor
          printed quality.
              The relationship between pixels and halftone dots defines
          the rule of resolution for raster-based images — the resolution
          of a raster image (ppi) should be two times the screen ruling
          (lpi) that will be used for printing.
              For line art, the general rule is to scan the image at the
          same resolution as the output device. Many laser printers and digital presses image at 600–1200
          dots per inch (dpi); imagesetters used to make printing plates for a commercial press typically
          output at much higher resolution, possibly 2400 dpi or more.


               opEn and rEsIzE an ImagE
          Every raster image has a defined, specific resolution that is established when the image
          is created. If you scan an image to be 3″ high by 3″ wide at 150 ppi, that image has
          450 pixels in each vertical column and 450 pixels in each horizontal row. Simply
          resizing the image stretches or compresses those pixels into a different physical space,
          but does not add or remove pixel information. If you resize the 3″ × 3″ image to
          6″ × 6″ (200% of the original), the 450 pixels in each column or row are forced to
          extend across 6″ instead of 3″, causing a marked loss of quality.
              The effective resolution of an image is the resolution calculated after any scaling
          is taken into account. This number is equally important as the original image
          resolution — and perhaps more so. The effective resolution can be calculated with a
          fairly simple equation:
                  Original resolution ÷ (% magnification ÷ 100) = Effective resolution


              If a 300-ppi image is magnified 150%, the effective resolution is:
                  300 ppi ÷ 1.5 = 200 ppi

              In other words, the more you enlarge a raster image, the lower its effective
          resolution becomes. In general, you can make an image 10% or 15% larger without
          significant adverse effects; the more you enlarge an image, however, the worse the
          results. Even Photoshop, which offers very sophisticated formulas (called “algorithms”)
          for sizing images, cannot guarantee perfect results.


       26 Project 1: Music CD Artwork

