


Page 4 - CS6_ID_Look_Inside
P. 4
Walk-Through
7
7
7
7
project
National Parks Info Pieces Project Goals
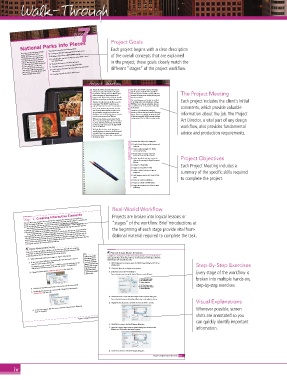
Each project begins with a clear description
Creating an XML le using tagged frames and content
Your client is the marketing manager is project incorporates the following skills:
for the National Parks Service Building a layout from imported XML content of the overall concepts that are explained
(NPS). She wants to create a series Controlling the structure of a layout to merge XML content
of collateral pieces that will be used
at tourism centers to lure potential into tagged frames in the project; these goals closely match the
visitors. She hired you to produce a Placing linked content into alternate layouts
one-sheet yer that will be distributed
in print and online, a rack card Creating interactive overlays for digital folio les different “stages” of the project workfl ow.
that can be placed in area hotels, a
postcard that will be given away to Creating alternate layouts for horizontal and vertical tablet
park visitors, and a folio le that will orientations
work on digital tablet devices. Creating a digital folio le for tablet devices
Project Meeting You have a lot of work to do, but InDesign
We just heard from the printer that we can
client comments only use one spot color based on the quote art director comments has the tools to make all of this possible in The Project Meeting
he provided. e logo uses two di erent spot
the same layout. Of course, so many di erent
versions do require some careful planning and
colors, and those are used throughout the
attention to detail.
layout as well. We decided to keep the metallic
Each project includes the client’s initial
gold, but we need you to change the other one.
e only thing you won’t be able to establish
in InDesign is the form distribution settings.
Now that it’s o cial, we’d also like to use the
actual name “ e BLVD” rather than just
saying “Downtown Lancaster” in most places.
can still de ne the necessary form elds right
in the layout.
Once you’ve nalized the print le, we need We’ll have to set that up in Acrobat, but you comments, which provide valuable
you to use the same content to create a PDF Layers are a great choice for managing
we can email to people, an e-book we can interactive content that won’t work in the print information about the job. The Project
distribute, and an HTML le that we can add layout. If you set everything up properly, you’ll
into the content area of our Web site. be able to accomplish all four versions without
We have a lot of great pictures from Charlie saving separate les for di erent output media. Art Director, a vital part of any design
Essers, a local photographer. We weren’t able to
use them all in the print version, but we’d like
to show as much as we can in the digital PDF workfl ow, also provides fundamental
and on the Web site.
We’d also like the form on the nal page to
actually function as a form in the le we email advice and production requirements.
to people. ere’s no point making people
print something out when they can just submit
the form by email. Review the colors in the existing le
project objectives Search for and change speci c content and
attributes
Export a color-managed PDF le for
commercial printing
Prepare layers to manage static and
interactive content in the same le
De ne hyperlinks and other interactive
elements as necessary for digital document
delivery Project Objectives
Create PDF form elds Each Project Meeting includes a
Export an interactive PDF le
De ne a table of contents for EPUB summary of the specifi c skills required
navigation
Link images to text for EPUB and HTML
export to complete the project.
Create an interactive slideshow
Export an e-book in EPUB format
Export the document to HTML for Web
publishing
Real-World Workfl ow
Stage 2 Creating Interactive Elements Projects are broken into logical lessons or
The print file is now complete, but you still need to repurpose the content into several different
versions for digital distribution — a common assignment in the professional market. To complete this
“stages” of the workfl ow. Brief introductions at
type of repurposing, you need to understand the options and capabilities of each format.
You already know that the PDF format can contain all of the elements — fonts, images, etc. —
required to create high-quality printing. Digitally distributed PDF files support interactive elements the beginning of each stage provide vital foun-
If you completed Project 5: Ireland Travel Brochure, you also saw that you can create interactive
and multimedia, which are not possible in static print jobs.
page transitions for files that are delivered digitally. Those transitions are only one of the interactive
and multmedia elements that are supported by the PDF format. In this stage of the project, you are
dational material required to complete the task.
going to create an interactive table of contents, hyperlinks, a slideshow of images, and a form that
users can fill out directly in Adobe Acrobat. InDesign allows you to create all of these elements directly
in the layout, without the need for additional software.
Create Versions with Layers
Rather than saving and editing multiple versions of the same basic file, you are going Find and Change ObjeCt attributes
to use layers to identify elements that function properly for all output versions, as well
as isolating objects that are only appropriate for certain formats.
Layers are also useful
1. With boulevard.indd open, navigate to Page 1 of the layout. Note: In addition to searching for specific text formatting attributes, you can also find and
replace specific object formatting attributes. In this exercise you will replace all brown-
for designing die-cut
2. In the Layers panel (Window>Layers), double-click the Layer 1 name to documents, which are stroked frames with the gold spot color. Step-By-Step Exercises
cut in non-rectangular
open the Layer Options dialog box.
The default in every file is named “Layer 1”, which is not terribly useful when you use
shapes or contain an area
1. With boulevard.indd open, open the Find/Change dialog box if it is not
multiple layers. Descriptive names are far better for any asset — including layers.
cut out within the page.
already open.
3. Change the Name field to Common Elements, then click OK. The tab on a manila 2. Click the Object tab to display those options. Every stage of the workfl ow is
folder and a folded
carton are two examples
3. In the Type menu, choose All Frames.
of die-cut jobs.
You can limit your search to specific kinds of frames, or search all frames.
Click this button to open broken into multiple hands-on,
the Find Object Format
Options dialog box.
4. Click the Create New Layer button at the bottom of the Layers panel. Click this button to open step-by-step exercises.
the Change Object Format
5. Double-click Layer 2 in the Layers panel. Change the layer name to
Options dialog box.
Static Print and click OK.
4. Click the button to open the Find Object Format Options dialog box.
You can find and change any formatting attributes that can be applied to a frame.
5. Display the Stroke options and click the Pantone 7554 C swatch. Visual Explanations
6. In the Layers panel, click the arrow to the left of the Common Elements Wherever possible, screen
layer to expand it.
shots are annotated so you
Project 6: Digital Layout Variations 371
can quickly identify important
6. Click OK to return to the Find/Change dialog box.
7. Open the Change Object Format Options dialog box and choose the information.
Pantone 875 C swatch in the Stroke options.
8. Click OK to return to the Find/Change dialog box.
Project 6: Digital Layout Variations 363
iv

