


Page 4 - CS6_AI_Look_Inside.pdf
P. 4
Walk-Through
4
4
4
4
project
Ski Resort Map Project Goals
Each project begins with a clear description
This project incorporates the following skills:
Your client manages a ski resort. He o Accessing and managing built-in libraries of swatches, brushes,
wants to create a basic map of the and symbols of the overall concepts that are explained
resort to show the locations of various o Defining custom art and pattern brushes for specific applications
resort features and amenities. The o Applying and controlling brush strokes in relation to paths
map will be printed independently, in the project; these goals closely match the
but also placed into other projects, o Saving user-defined libraries of custom assets
such as the local entertainment o Opening and using symbol libraries created by other users
magazine and local restaurant menus.
o Understanding and creating symbols and symbol instances
o Transforming symbol instances and editing symbol artwork different “stages” of the project workfl ow.
o Replacing symbols in placed instances
o Creating a clipping mask
Project Meeting When you see what he gave us, you can see
This map will be available on kiosks around
client comments the resort, but it is also going to be used in art director comments what needs to be done. He didn’t get any The Project Meeting
advertising and cross-promotional marketing.
farther than different colored lines and some
We’ll be placing it into the local entertainment
text telling where some things are.
magazine and papers with some coupons,
I already showed the client some ideas for icons
and we also have some interest from local
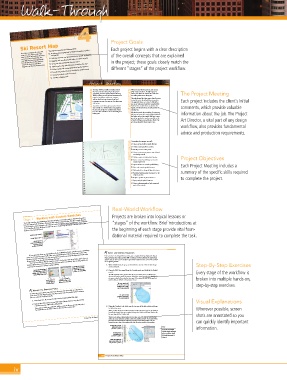
Each project includes the client’s initial
instead of text to identify different amenities.
restaurants to print the map on their placemats
He approved those, so I created a library for
and menus.
You’ll need to include the icons both in the
I started to create the map I want, but I need
legend and wherever they are indicated by the
you to finish it. I did find some nice graphics you to use when you build the completed file. comments, which provide valuable
for the resort lodge, but I realized that I don’t existing text.
have the time or skills to create something that We also discussed the possibility of converting
looks good. information about the job. The Project
this into an interactive map for digital kiosks in
the lodge, and on the resort’s Web site. I want
you to use symbols as much as possible so the
artwork will import smoothly into Flash if we Art Director, a vital part of any design
get the go-ahead for those projects too.
workfl ow, also provides fundamental
advice and production requirements.
project objectives To complete this project, you will:
o Open and use built-in swatch libraries
o Define custom gradient swatches
o Modify a stroke width profile
o Create a new custom pattern swatch based
on existing artwork
o Define custom art and pattern brushes
o Save a custom brush library so it can be
accessed again later Project Objectives
o Open and use an external symbol library Each Project Meeting includes a
o Place and control symbol instances
o Edit symbols to change all placed instances summary of the specifi c skills required
o Break the link from placed instances to the
original symbols
o Replace symbols in placed instances to complete the project.
o Spray mutiple symbol instances
o Create a clipping mask to hide unwanted
parts of the artwork
Real-World Workfl ow
Stage 1 Working with Custom Swatches Projects are broken into logical lessons or
The default Swatches panel (Window>Swatches) includes a seemingly random collection of swatches
from the various built-in libraries. Illustrator also includes a large number of built-in swatch libraries,
“stages” of the workfl ow. Brief introductions at
many of which contain thematic color schemes (such as Earthtone, Metal, and Nature). These libraries
are accessed by choosing Window>Swatch Libraries or by opening the Swatch Libraries menu at the
bottom of the Swatches panel. the beginning of each stage provide vital foun-
Default Swatches panel dational material required to complete the task.
Swatch Libraries menu
Use this menu to
show only certain types
of swatches (color,
gradient, or pattern).
If you open more than one swatch library from the Window>Swatch Libraries menu, each library
opens as a new panel, grouped with other open swatch libraries. (Library panels open in the same Once you have created gradient swatches, you can apply them by simply selecting an
Apply And Control GrAdients
location and state as the last time they were used. If a panel is not automatically grouped with other
If you open a different library using the menu at the bottom of an open library panel, the new
object, selecting the target attribute (fill or stroke), and then clicking the appropriate
library panels, it was already used and repositioned.)
swatch. You can then use the Gradient panel and Gradient tool to control the position
library replaces the one that was active when you opened the new library. You can drag any library
of an applied gradient.
panel out of the group to manage it independently.
on the artboard.
library from the panel’s
Swatch Libraries menu
Opening the Metal library Opening the Beverages 1. With summit map.ai open, use the Selection tool to select the lake shape Step-By-Step Exercises
2. Open the Fill Color panel from the Control panel, and click the Ice Radial
from the Window>Swatch replaces the Metal library.
Libraries menu adds it to the swatch. Every stage of the workfl ow is
Sweets library panel group. The Fill and Stroke Color panels include the same swatches that are available in the
document’s Swatches panel. Because you deleted the unused swatches from the default
Use these buttons to
Use this button to show the previous or next set, you see only the few colors that were part of the original file and the two gradient broken into multiple hands-on,
swatches that you defined in the previous exercise.
open the menu of library in the active panel.
available libraries. The same swatches in
the Swatches panel are step-by-step exercises.
available in the Control
panel’s pop-up panels.
Manage the SwatcheS Panel
In this project, your client created the basic elements, but was unable to complete the The applied radial
entire map. The first logical step in any project where you are provided with an existing
file is to review the supplied artwork.
1. Download AI6_RF_Project4.zip from the Student Files Web page. gradient is centered in
the selected object.
2. Expand the ZIP archive in your WIP folder (Macintosh) or copy the archive 3. Using the Gradient tool, click near the top area of the lake object and drag Visual Explanations
contents into your WIP folder (Windows).
This results in a folder named Skiing, which contains the files you need for this project.
You should also use this folder to save the files you create in this project.
to the bottom area.
When you first choose the Gradient tool, the Gradient Annotator appears; by default, it
is exactly horizontal. After you complete this step, the Gradient Annotator matches the Wherever possible, screen
line you drag with the Gradient tool. shots are annotated so you
Project 4: Ski Resort Map 179 When you are using a radial gradient, the first place you click with the Gradient tool
defines the center point (the starting color) of the applied gradient. The location where
you release the mouse button marks the outer edge of the radial gradient. The area can quickly identify important
beyond the outer edge of the gradient fills with the end-stop color of the gradient.
The first place you click
defines the starting Note: information.
point of the gradient.
If you are not satisfied
with the length and angle
The direction you of your gradient, simply
drag defines the
angle of the gradient. click and drag again to
change it.
Where you release the
mouse button defines the
end point of the gradient.
184 Project 4: Ski Resort Map
iv

