


Page 19 - CC2018_AI_Look_Inside
P. 19
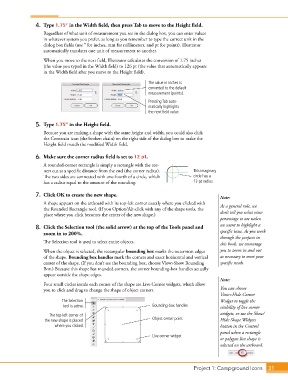
4.  Type 1.75” in the Width field, then press Tab to move to the Height field.
                   Regardless of what unit of measurement you see in the dialog box, you can enter values
                   in whatever system you prefer, as long as you remember to type the correct unit in the
                   dialog box fields (use 3 for inches, mm for millimeters, and pt for points). Illustrator
                   automatically translates one unit of measurement to another.

                   When you move to the next field, Illustrator calculates the conversion of 1.75 inches
                   (the value you typed in the Width field) to 126 pt (the value that automatically appears
                   in the Width field after you move to the Height field).

                                                              The value in inches is
                                                              converted to the default
                                                              measurement (points).
                                                              Pressing Tab auto-
                                                              matically highlights
                                                              the next field value.

                5.  Type 1.75” in the Height field.
                   Because you are making a shape with the same height and width, you could also click
                   the Constrain icon (the broken chain) on the right side of the dialog box to make the
                   Height field match the modified Width field.


                6.  Make sure the corner radius field is set to 12 pt.
                   A rounded-corner rectangle is simply a rectangle with the cor-
                   ners cut at a specific distance from the end (the corner radius).   This imaginary
                   The two sides are connected with one-fourth of a circle, which   circle has a
                   has a radius equal to the amount of the rounding.             12-pt radius.

                7.  Click OK to create the new shape.                                       Note:

                   A shape appears on the artboard with its top-left corner exactly where you clicked with   As a general rule, we
                   the Rounded Rectangle tool. (If you Option/Alt-click with any of the shape tools, the
                   place where you click becomes the center of the new shape.)              don’t tell you what view
                                                                                            percentage to use unless
                8.  Click the Selection tool (the solid arrow) at the top of the Tools panel and   we want to highlight a
                   zoom in to 200%.                                                         specific issue. As you work
                                                                                            through the projects in
                   The Selection tool is used to select entire objects.                     this book, we encourage
                   When the object is selected, the rectangular bounding box marks the outermost edges   you to zoom in and out
                   of the shape. Bounding box handles mark the corners and exact horizontal and vertical   as necessary to meet your
                   center of the shape. (If you don’t see the bounding box, choose View>Show Bounding   specific needs.
                   Box.) Because this shape has rounded corners, the corner bounding-box handles actually
                   appear outside the shape edges.
                                                                                            Note:
                   Four small circles inside each corner of the shape are Live Corner widgets, which allow
                   you to click and drag to change the shape of object corners.             You can choose
                                                                                            View>Hide Corner
                           The Selection                                                    Widget to toggle the
                           tool is active.                      Bounding-box handles        visibility of live corner
                     The top-left corner of                                                 widgets, or use the Show/
                   the new shape is placed                      Object center point         Hide Shape Widgets
                        where you clicked.                                                  button in the Control
                                                                                            panel when a rectangle
                                                                Live corner widget
                                                                                            or polygon live shape is
                                                                                            selected on the artboard.


                                                                                 Project 1: Campground Icons    31

