


Page 4 - CS6_GD_Look_Inside.pdf
P. 4
Walk-Through
3
3
3
3
project
Identity Package Project Goals
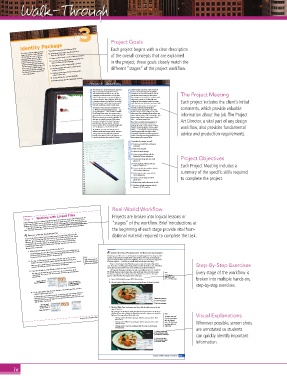
Each project begins with a clear description
is project incorporates the following skills:
Your client, Graham Apple, owns an Developing custom logo artwork based on an
organic orchard in Central Florida. object in a photograph of the overall concepts that are explained
He hired you to create a corporate Using a gradient mesh to create realistic color blends
identity package so he can begin Converting type to outlines and manipulating letter
branding his products to reach a in the project; these goals closely match the
larger consumer base in gourmet shapes to create a nished logotype
groceries throughout the Southeast. Using layers to easily manage complex artwork
He asked you to develop a logo, and
then create the standard identity
pieces (letterhead and envelope) that Creating multiple artboards to contain speci c different “stages” of the project workfl ow.
projects and layouts
he will use for business promotion Building various logo versions to meet speci c
and correspondence. output requirements
Saving EPS les for maximum exibility
Printing desktop proofs of individual artboards
Project Meeting Digital images come from a wide variety of
e Chateau is a unique destination restaurant
client comments that consistently wins awards from local art director comments sources: scanned photographs and digital The Project Meeting
and national food and wine reviewers. e
cameras are the two most common, as is the
case for the client’s images for this project.
restaurant was rst opened in 1952 by Paul
and Gina Roseman as a rest stop and diner for
Some images can be used as is, or at least with
travelers along the Sierra Highway. While the
only minor correction. Realistically, most
Each project includes the client’s initial
professional photographers reshoot an image
restaurant remains in the family, it has evolved
from home-style comfort food to more exotic
fare such as wild game with a French twist.
Unfortunately, however, not every project
e history of the restaurant is important to until they have one that doesn’t need your help. comments, which provide valuable
involves a professional photographer.
us. We have a Roseman family portrait — my Consumer-level cameras have come down
great-grandparents — that we’d like to include in price and gone up in quality to the point
on the back of the menu. e picture is a bit where many non-professionals shoot their own information about the job. The Project
grainy and has some damage, though, and we’d photos without proper skill or knowledge. at
like you to clean it up as much as possible. We means many of those images require a bit of
also want to include a picture of the current help — and some require a lot.
executive chef, who is Paul and Gina’s great- Even when a professional photographer is Art Director, a vital part of any design
grandniece, in the same section. e only involved, not every image comes from a
picture we have of her is very dark though, and perfectly lit studio. Location shots — where
we’re hoping you can make it look better. workfl ow, also provides fundamental
a subject is photographed in a “real-world”
In addition, we’ve taken several pictures of setting — can’t always be captured perfectly.
di erent meals that Suzanne created. We want ose images usually need work as well.
you to make sure they will look as good as Fortunately, Photoshop provides a powerful advice and production requirements.
possible when printed. You’re the expert, so we toolset for solving most image problems, or at
trust that you know what needs to be done. least improving the worst of them.
To complete this project, you will:
project objectives Remove grain with blur and sharpen
techniques
Heal severe scratches
Clone out major damage
Correct minor problems with the
Brightness/Contrast adjustment
Correct tonal range with the Levels
adjustment Project Objectives
Correct lighting problems with the
Exposure adjustment Each Project Meeting includes a
Correct overall color problems with the
Color Balance adjustment summary of the specifi c skills required
Correct precise color values with the
Curves adjustment
Correct an RGB image to CMYK to complete the project.
gamut limits
Embed color pro le information in a le
Combine multiple exposures with the
Merge to HDR Pro utility
Real-World Workfl ow
Stage 2 Working with Linked Files Projects are broken into logical lessons or
Adobe InDesign supports a variety of graphics formats. Your ultimate output goal will determine the
specific type of graphics used in a particular job. For print applications such as the brochure you’re
building in this project, you should use high-resolution raster image files or vector-based graphics files.
“stages” of the workfl ow. Brief introductions at
Depending on what type of file you are importing, you have a number of options when you place
a file. This stage of the project explores the most common file formats for print design workflows. the beginning of each stage provide vital foun-
Replace a Native illustRatoR File
As part of the Adobe Creative Suite, InDesign supports native Adobe Illustrator files dational material required to complete the task.
(with the “.ai” extension) that have been saved to be compatible with the PDF format.
Illustrator files can include both raster and vector information (including type and
embedded fonts), as well as objects on multiple layers in a variety of color modes
(including spot colors, which are added to the InDesign Swatches panel when the
Illustrator file is imported).
1. With boulevard.indd open, open the Links panel. CorreCt Lighting ProbLems with the exPosure Adjustment
The file blvd logo.ai has been placed three times, but the file has been modified since it
was placed. Remember from Project 9: HeartSmart Newsletter, that placed files need to
be present and up to date for the file to output properly.
2. On Page 1 of the layout, use the Direct Selection tool or the Content Note: Many images are either over- or underexposed when photographed. If an image is under-
exposed, it appears dark and lacks detail in the shadows. If an image is overexposed, it
Make sure you select the
Grabber to select the placed graphic with the Modified warning icon.
appears too light and lacks detail in the highlights. You can use the Exposure adjustment
content inside the frame
When you select a specific instance of a file that has been placed multiple times, the item
to correct exposure — and thus, the overall detail and contrast in the image.
and not the actual frame.
Keep in mind, however, that Photoshop cannot create information that doesn’t
expands in the Links panel and the selected instance is highlighted.
3. Open the Transform panel (Window>Object & Layout>Transform). exist. If you have an underexposed image with no detail in the shadow areas, Photoshop Note: Step-By-Step Exercises
cannot generate that detail for you. Some problems are simply beyond fixing.
The Exposure dialog box is designed to make tonal adjustments to 32- and 64-bit
The options in the Transform panel are the same as those on the left side of the
Every stage of the workfl ow is
Control panel. As you can see, the selected graphic is scaled to approximately 62%
HDR (high dynamic range) images, but it also works with 8-bit and 16-bit images.
(gamma 1.0) rather than the image’s current color space.
proportionally. The Exposure adjustment works by performing calculations in a linear color space HDR refers to
high-density range
1. Open chicken.jpg from your WIP>Menu folder. (32- or 64-bit) images. broken into multiple hands-on,
Only the selected The placed instance is
instance is highlighted. scaled to approximately 2. Choose Image>Adjustments>Exposure and make sure Preview is checked.
62% proportionally. step-by-step exercises.
4. In the Links panel, click the main listing for the blvd logo.ai file and then
click the Update Link button.
By selecting the main item listing instead of a specific instance, you update all instances
of that file at one time. If you want to update individual instances, you can use the
Modified warning icons on the page, or select only the specific instance in the panel and
click the Update Link button. White Point eyedropper
Gray Point eyedropper
Select the main Black Point eyedropper
item to update all 3. Click the White Point eyedropper, and then click the white area on the top
instances at once.
Update Link button edge of the plate.
The eyedroppers in the Exposure dialog box adjust the image’s luminance (or the degree
of lightness, from white to black). By adjusting the luminance only, you can change the Note:
lightness of the image without affecting the color. Visual Explanations
Project 10: Combined Brochure 547 • Clicking with the Black Point eyedropper shifts the point you click to black The White Point and
Gray Point eyedroppers
(0 luminance).
• Clicking with the White Point eyedropper shifts the point you click to white affect the Exposure Wherever possible, screen shots
value. The Black Point
(100 luminance). eyedropper affects the
• Clicking with the Gray Point eyedropper shifts the point you click to gray Offset value.
(50 luminance). are annotated so students
Click here with the White
Point eyedropper to define
the white area of the image. can quickly identify important
Clicking with the White
Point eyedropper changes
the Exposure setting. information.
Project 6: Menu Image Correction 335
iv

