


Page 4 - CS6_PS_Look_Inside
P. 4
Walk-Through
4
project
City Promotion Cards Project Goals
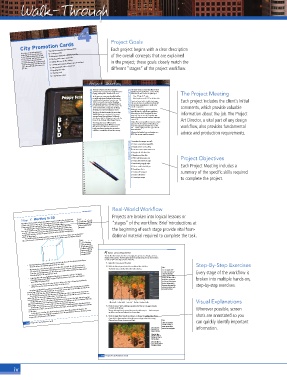
Each project begins with a clear description
Your client is the Redevelopment is project incorporates the following skills:
C reating new les
Authority for the city of Lancaster, M anaging missing and mismatched pro les of the overall concepts that are explained
in the California high desert (north
of Los Angeles). You have been hired Working with content-aware tools
to create a series of promotional A dding e ects in the Blur Gallery in the project; these goals closely match the
postcards featuring the improvements C reating and managing di erent types of text layers
that have been made over the last two
years, that will help drive tourism to
the area. U sing paragraph styles to format text different “stages” of the project workfl ow.
A pplying layer styles
Working in 3D
C reating layer comps
Project Meeting e client wants to create these les for both
We want to feature two of our proudest
client comments achievements in a postcard campaign that we’re art director comments digital and print applications, so you should The Project Meeting
hoping will help drive tourism to the area.
de ne the le size to meet the print specs:
Trim: 5 high 7 wide
In the past two years, more than $50 million
Bleed requirement: 0.125 on all four sides
in public and private funding has been spent
Each project includes the client’s initial
revitalizing the downtown Lancaster area. e
I want each postcard to include two images.
BLVD, Lancaster’s new outdoor shopping
and dining destination, is distinguished by its
require some manipulation to work in the
beautiful sidewalk streetscape and ramblas. e
overall composition.
BLVD is lined with a unique mix of dining, e ones we have are excellent, but they will comments, which provide valuable
shopping, arts, and entertainment venues. Although compositing type and images is
e Poppy Festival is attended by more than typically done in a page layout application, information about the job. The Project
there isn’t a lot of text to include on these
20,000 visitors over two days. It’s an award- postcards. You can use the Photoshop type
winning festival that celebrates California’s
state ower, which is tting since we’re also the tools to do what you need, without requiring a
separate le.
home of the Antelope Valley Poppy Preserve. Art Director, a vital part of any design
I’d also like to see two di erent versions of each
e images you create will be used in postcard. e 3D options in Photoshop can
digital advertising and on Web sites, but we create the appearance of depth even in a at workfl ow, also provides fundamental
also plan to print them for inclusion in a le — which might just be the “pop” that the
larger promotional package that we send to client asked for.
conference coordinators around the country.
When you’re nished, save each version as a advice and production requirements.
JPEG that we can email for approval.
To complete this project, you will:
project objectives C reate a new color-managed le
A pply content-aware scaling
U se the Content-Aware Move tool
A pply a tilt-shift blur e ect
A pply an iris blur e ect
P lace and format point text
C reate and control area type Project Objectives
W ork with paragraph styles Each Project Meeting includes a
C reate a solid-color ll layer
A pply layer e ects
C reate a 3D postcard summary of the specifi c skills required
C reate a 3D sphere
C reate layer comps to complete the project.
Real-World Workfl ow
Stage 5 Working in 3D Note: Projects are broken into logical lessons or
Photoshop CS6 Extended includes the ability to create real-time, three-dimensional
You must have Photoshop
“stages” of the workfl ow. Brief introductions at
artwork, either from scratch or by importing wire frames and rendered artwork from
Extended to complete the
industry-standard 3D applications such as Maya or 3D Studio Max.
e following is a brief introduction to Photoshop’s 3D functionality. If you
the project.
have never worked in real three dimensions before, you will almost certainly have exercises in this stage of the beginning of each stage provide vital foun-
to spend some extra time learning the related terminology. We also encourage you
to experiment with the various 3D options until you are comfortable manipulating
You should already be familiar with the concept of the X and Y axes. When you work with 3D
objects in digital space. dational material required to complete the task.
les, you also need to understand the concept of the Z axis, which creates the illusion of depth. Note:
Z In 3D terminology,
moving an object in
3D space (near to far)
is called a translation;
rotating an object in
3D space is called a
Y transformation. APPLY AN IRIS BLUR EFFECT
e Iris Blur lter mimics the e ect of changing the aperture, focal length, and focus
distance with a camera. e blur applies around a central point; you can use on-screen
X controls to de ne the shape and size of the blur.
• Meshes (sometimes called wireframes) are the basic skeletons of three-dimensional objects. 1. Make the festival.psd le active. Step-By-Step Exercises
e mesh de nes the underlying shape of the 3D object.
• Materials refer to the physical surface of an object (for example, the aluminum of a soda 2. With the Bloom layer selected, choose Filter>Blur>Iris Blur. Note:
can or the felt of a fedora hat). Photoshop uses a number of texture-map characteristics to
create the material appearance of a 3D object; you can also de ne existing two-dimensional
e Iris blur is also controlled in the Blur Gallery interface.
You can apply a blur
Photoshop layers as the material for a mesh.
• Lighting a ects the way highlights and shadows are created on and by a 3D object. to only certain parts of Every stage of the workfl ow is
a layer by drawing a
Photoshop supports four di erent types of lighting (in nite, spot, point, and image) to
selection marquee before
broken into multiple hands-on,
opening the Blur Gallery.
• Camera position refers to the point of view relative to the object. Photoshop includes the In this case, you can use step-by-step exercises.
create di erent lighting e ects.
the Selection Bleed option
(in the Options bar) to
ability to move the camera around an object on all three axes.
determine how much the
To understand digital 3D modeling, you should try to think about the way you interact with the
world at large. When you walk around a car, for example, you are able to see the di erent sides of the selected area blends with
the unselected areas.
You should also understand that what you see depends not only on your position relative to an
car; the front, back, and sides all have di erent appearances.
object, but also on the position of the object. For example, if you stand still but someone backs a car
Finally, what you see on a 3D object also depends on the position of the light. When the garage
into a parking space, you see a di erent aspect of the same car.
light shines behind you, for example, you might see your own re ection in the car’s window. When the Ellipse Handle Feather Handle Center “pin” Blur Ring Roundness Handle Visual Explanations
interior lights are on, you see more of the car’s interior than your re ection.
It’s important to keep these overall concepts in mind: 3D modeling considers the physical shape
and position of an object, your position relative to the object, and the position of light sources relative 3. Click the center “pin” and drag to position the blur so it is approximately Wherever possible, screen
centered on the ower.
It is important to realize that whole books are written about Photoshop’s 3D features. e
exercises in this stage were designed to introduce you to the possibilities relative to enhancing a static can de ne more than one focal point on the same layer. shots are annotated so you
to the object. You can click away from the existing blur controls to add a new pin — which means you
image such as the postcards in this project.
4. Click the right ellipse handle and drag in to change the width of the ellipse.
If you click the ellipse away from the handle, you can enlarge or shrink the existing Note:
260 Project 4: City Promotion Cards ellipse without a ecting its proportional shape. Click the Roundness can quickly identify important
Handle and drag to
make the blur shape
Drag the pin to more or less rectangular. information.
move the focal
point of the blur.
Drag the Ellipse
Handle to rotate or
change the shape of
the blur ellipse.
Drag the Ellipse to
resize the blur without
changing its shape.
228 Project 4: City Promotion Cards
iv

