


Page 4 - CC2017_AI_Look_Inside
P. 4
Walk-Through
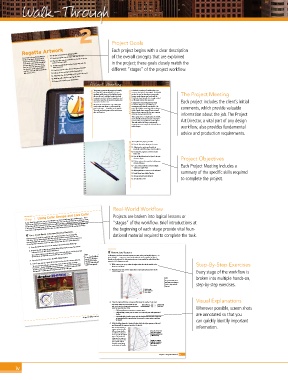
Project Goals
Regatta Artwork Each project begins with a clear description
o Drawing complex custom shapes with the Pen tool
Your client is the marketing director This project incorporates the following skills: of the overall concepts that are explained
for the Long Beach Regatta, which o Editing anchor points and handles to control the precise
attracts tens of thousands of visitors position of vector paths in the project; these goals closely match the
to the beach community throughout
the four-day event. You have been o Drawing irregular shape outlines by painting with the
hired to create the primary artwork Blob Brush tool
for this year’s event, which will be o Creating a custom color scheme using saved swatches different “stages” of the project workflow.
used in a variety of different products o Adding interest and depth with color gradients
(ads, posters, etc.).
o Adjusting color, both globally and in specific selections
o Working with a file that uses Typekit fonts
o Saving a PDF file for print distribution
Project Meeting I sketched a mock-up of a sailboat that you
e poster to promote the Regatta is basically
client comments the “play bill,” and we will place it in store art director comments can use as the basis for the artwork. You should The Project Meeting
use the Pen tool to draw the necessary paths
windows, public sites, and on bulletin boards
because simple shapes won’t work and the
all over the city. It will also be placed in local
Pencil tool doesn’t provide ne enough control
newspapers and entertainment magazines, and
Each project includes the client’s initial
used as the cover for the souvenir program that
to e ciently achieve what you need.
we produce for the event.
I assigned the ocean background artwork
We want the artwork to be very colorful and
incorporate your artwork into that le. e
vivid, so the main focus — and most of the
poster le includes several text objects that use
poster real estate — should be on the graphics. to another designer, so you will have to comments, which provide valuable
e only text for the poster is the event name, Adobe Typekit fonts, so you’ll have to install
date, and location. those on your computer for the type to appear information about the job. The Project
correctly when you open the le.
is is going to be a complex piece of artwork,
so you should pay close attention to the layer
content when you organize the various pieces. Art Director, a vital part of any design
at will make it far easier to edit speci c
components as necessary if the client decides to
make changes. workflow, also provides fundamental
advice and production requirements.
project objectives To complete this project, you will:
o Use the Pen tool to draw precise curves
o Adjust anchor points and handles to
precisely control the shape of vector objects
o Reshape line segments with the Anchor
Point tool
o Use the Blob Brush tool to “paint” the area
of vector shapes
o De ne custom color swatches to allow easy Project Objectives
universal changes
o Create color gradients to blend multiple Each Project Meeting includes a
colors in a single object
o Adjust gradients in context on the artboard summary of the specific skills required
o Install fonts from Adobe Typekit
o Manage artwork with sublayers
o Save the le as PDF to complete the project.
Real-World Workflow
Stage 1 Using Color Groups and Live Color Projects are broken into logical lessons or
As you should already know, you can use Illustrator to create virtually any type of illustration — from
a basic vector drawing to a complex, realistic illustration. You can also use Illustrator to design an entire
“stages” of the workflow. Brief introductions at
composition, whether a letterfold brochure that will be printed or a Web site interface that will be used
as the map for an HTML page. In the first stage of this project, you are going to use color groups and
Live Color to adjust global and specific colors to unify various elements of the existing site design.
Use a Color GroUp to ChanGe MUltiple swatChes
dational material required to complete the task.
Color groups are useful for organizing color swatches into logical and manageable the beginning of each stage provide vital foun-
collections. You can make changes that affect all colors within a group; this takes the
concept of global color swatches one step further. In this exercise, you create a group from
the tracing object swatches, so you can make changes that affect the entire illustration.
1. Download Website_AICC14_RF.zip from the Student Files Web page.
2. Expand the ZIP archive in your WIP folder (Macintosh) or copy the archive
contents into your WIP folder (Windows).
This results in a folder named Website, which contains the files you need for this project.
reshape line seGMents
You should also use this folder to save the files you create in this project.
As you work through the
parts of shapes — so you can create exactly what you need, regardless of what is
3. Open the file dh-site.ai from the WIP>Website folder. Note: the importance of the In Illustrator, you have numerous options to create, select, and modify shapes — or Step-By-Step Exercises
exercises in this project,
already on the artboard. In this exercise you use a new method to easily behind line
4. In the Layers panel, expand all five layers and review the various elements.
segments in the shapes you need.
The basic site layout follows a structure that is fairly common in Web site design.
structure used in this file
will become apparent.
Four layers — Header, Navigation, Main, and Footer — represent the various sections
1. With sailboat.ai open, make the right sail in the sketch visible in the
of a basic HTML page. A fifth layer, named Background, contains a single path with a
document window.
solid gray fill — representing the background color of the entire page.
2. Using the Pen tool, click to place three connected anchor points at the
corners of the sail.
broken into multiple hands-on,
Note: Every stage of the workflow is
As a general rule, use as
few points as necessary to
create a shape with the step-by-step exercises.
Pen tool.
Click to create
three connected
corner points.
Visual Explanations
3. Press the Option/Alt key to temporarily access the Anchor Point tool.
e Anchor Point tool, nested under the Pen The Pen tool is Anchor Point
tool, can be used to change anchor points from technically active. tool cursor
corner to smooth (or vice versa): Wherever possible, screen shots
• Click a smooth point to convert it to a corner point.
• Click and drag a corner point to convert it to a smooth point with symmetrical
handles. are annotated so that you
Project 8: Web Site Interface 389 • Option/Alt-click a handle to move only that handle, even if the related point has
an opposing handle; a smooth point is converted to a corner point as you drag
the handle. can quickly identify important
4. While holding down the Option/Alt key, click the right segment of the sail
and drag until the segment matches the sketch. information.
You can click and drag a
segment to bend it into a
di erent shape; handles Using the Anchor Point
are added to or adjusted tool, click a segment
as necessary for the related and drag to push it into
a different shape.
points. is method of
reshaping a line segment
makes it very easy to edit Handles are added or
your artwork without adjusted as necessary
manually manipulating when you reshape a
anchor points or handles. line segment.
Project 2: Regatta Artwork 87
iv

