


Page 15 - CC2017_AI_Look_Inside
P. 15
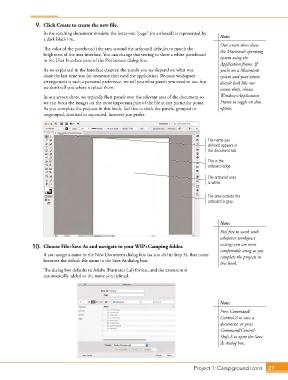
9.  Click Create to create the new file.
                   In the resulting document window, the letter-size “page” (or artboard) is represented by   Note:
                   a dark black line.
                                                                                            Our screen shots show
                   The color of the pasteboard (the area around the artboard) defaults to match the   the Macintosh operating
                   brightness of the user interface. You can change this setting to show a white pasteboard
                   in the User Interface pane of the Preferences dialog box.                system using the
                                                                                            Application frame. If
                   As we explained in the Interface chapter, the panels you see depend on what was   you’re on a Macintosh
                   done the last time you (or someone else) used the application. Because workspace   system and your screen
                   arrangement is such a personal preference, we tell you what panels you need to use, but   doesn’t look like our
                   we don’t tell you where to place them.                                   screen shots, choose
                   In our screen shots, we typically float panels over the relevant area of the document so   Window>Application
                   we can focus the images on the most important part of the file at any particular point.   Frame to toggle on that
                   As you complete the projects in this book, feel free to dock the panels, grouped or   option.
                   ungrouped, iconized or expanded, however you prefer.


                                                                                       The name you
                                                                                       defined appears in
                                                                                       the document tab.

                                                                                       This is the
                                                                                       artboard edge.

                                                                                       The artboard area
                                                                                       is white.


                                                                                       The area outside the
                                                                                       artboard is gray.


                                                                                            Note:
                                                                                            Feel free to work with
                                                                                            whatever workspace

               10.  Choose File>Save As and navigate to your WIP>Camping folder.            settings you are most
                                                                                            comfortable using as you
                   If you assign a name in the New Document dialog box (as you did in Step 5), that name   complete the projects in
                   becomes the default file name in the Save As dialog box.
                                                                                            this book.
                   The dialog box defaults to Adobe Illustrator (.ai) format, and the extension is
                   automatically added to the name you defined.


                                                                                            Note:
                                                                                            Press Command/
                                                                                            Control-S to save a
                                                                                            document, or press
                                                                                            Command/Control-
                                                                                            Shift-S to open the Save
                                                                                            As dialog box.


                                                                                 Project 1: Campground Icons    27

