


Page 4 - CS6_DW_Look_Inside
P. 4
Walk-Through


                                    1 1 1 1
                                project

          Bistro Web Site                      Project Goals
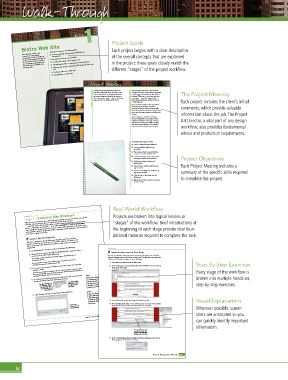
                                               Each project begins with a clear description
                        is project incorporates the following skills:
          Your client has opened a new     Creating, exporting, and removing site de  nitions in
          restaurant in a fast-growing   Dreamweaver  of the overall concepts that are explained
          community in Southern California.     Moving   les around in a site root folder
          He has already designed the pages for
          his site, but has hired you to make     Creating relative links between pages in a site  in the project; these goals closely match the
           sure everything works properly and     De  ning absolute links to external sites and email addresses
           then make the site available to the     Improving search engine optimization (SEO) with   le names and
           browsing public.                    different “stages” of the project workflow.
                       titles
                        Cloaking site   les from a Web server
                        Uploading   les to a Web server
                                      Project Meeting    e more pages you add to a site, the more
                                        I already created the pages for our site, but I
                                       client comments  don’t know what links to use, and I’m not sure   art director comments  complex it becomes, until it’s almost impossible   The Project Meeting
                                                       to make sense of what you have and where it
                                        how to create them. I’ve also heard that there
                                                       is located. Web sites — even those with only
                                        are certain things you should do to improve a
                                                       a few pages — should be designed with a
                                        site’s search engine rating — which is obviously
                                                       good organizational plan, making it easier to
                                                                            Each project includes the client’s initial
                                        important for a small business like mine.
                                                       modify pages later.
                                                       Once you have a handle on the organization,
                                                       make sure the pages link to each other
                                                                            comments, which provide valuable
                                                       properly. Visitors get frustrated very quickly
                                                       when they’re forced to return to the home page
                                                       every time they want to jump to a di erent set
                                                       of pages.
                                                         e last thing you should do is add page   information about the job. The Project
                                                       titles and change  le names to give a better
                                                       indication of what’s on each page. Doing so   Art Director, a vital part of any design
                                                       will make the site more accessible to people
                                                       with screen-reader software, and it will also
                                                       improve the site’s ratings on search engines.  workflow, also provides fundamental
                                                                            advice and production requirements.
                                                       project objectives  To complete this project, you will:
                                                         Create a Dreamweaver site de nition
                                                         Create new folders within the site
                                                        root folder
                                                         Use various methods to move  les from
                                                        one place to another within the site
                                                         Create links between pages using several
                                                        techniques available in Dreamweaver
                                                         Di erentiate between relative and   Project Objectives
                                                        absolute links
                                                         Copy and paste uniform links from one   Each Project Meeting includes a
                                                        page to another
                                                         Improve searchability and usability using   summary of the specific skills required
                                                        page names and titles
                                                         Cloak site  les to hide them from the
                                                        Web server          to complete the project.
                                                         Upload the site  les to a server so they can
                                                        be viewed online
                                                Real-World Workflow
           Stage 1  Exploring Site Structure    Projects are broken into logical lessons or
           When you start a new project that involves updating an existing site, your first task is to assess the file
           and folder structure. Doing so gives you a good idea of what the site contains.
            A small site with only a few pages requires very little organization; in fact, you can place all of
           the files — Web pages and image files — in one folder (although even a small site benefits from a   “stages” of the workflow. Brief introductions at
            dedicated folder for images). Larger sites, however, require careful organization of file names, pages,
            and image files. A good site design with excellent organization speeds development now, and makes it
                                                the beginning of each stage provide vital foun-
            much easier to update the site later.   dational material required to complete the task.
             Create a New Site DefiNitioN
            Web sites are designed so all of the Web pages, image files, style sheets, and other
            resources are stored on your local drive in a base folder called the root folder. Other
            folders can be placed inside (below) the root folder to make it easier to manage and
              1.  Download DW6_RF_Project1.zip from the Student Files Web page.
            organize files.
              2.  Expand the ZIP archive in your WIP folder (Macintosh) or copy the archive   Dreamweaver provides many ways to insert images into Web pages, one of which is
                                               Insert an Image from the fIles Panel
              contents into your WIP folder (Windows).
              This results in a folder named Kinetic, which contains all the files you need to
                                              a file from the Files panel and place it onto a Web page.
              If necessary, refer to Page 9 of the Interface chapter for specific instructions on
              complete this project.          using the Images button on the Common Insert panel. Another way is to simply drag
                                                1.  Open the blog.html file from the Files panel.
              expanding or accessing the required resource files.
               3.  In Dreamweaver, set up your workspace so the Files, Insert, and Properties     2.  In the Design pane, select and delete the words “INSERT LOGO HERE” at   Step-By-Step Exercises
                                               the bottom of the page.
               It doesn’t matter which saved workspace you start with. The primary tools you need for   Every stage of the workflow is
               panels are visible.
               this project are the Files, Insert, and Properties panels. We have closed all other panels to
               maximize the available space in our screen shots.
               4.  In the Files panel, click the Manage Sites link or open the Directory menu   Note:  broken into multiple hands-on,
                                     When a site is defined
               and choose Manage Sites from the bottom of the list.
                                     in Dreamweaver, the
                                     top of the Files panel is
                             Manage Sites opens
                 This option performs the   If available, clicking   Manage Sites link at the   step-by-step exercises.
                 same function as clicking   the Manage Sites   replaced by a menu that
                  the blue Manage Sites   dialog box.  defaults to Local view.
                  link to the right of the
                   Directory menu.
                5.  Click the New Site button in the Manage Sites dialog box.  Note:
                                      Ellipses in a menu or
                                      button name indicate
                                      that clicking will open
                                      a dialog box. We do not
                                      include the ellipses in our     3.  In the Files panel, expand the images folder (if necessary).  Visual Explanations
                              Click here to   instructions.    4.  From the Files panel, drag crowe-photography-small.jpg to the location
                              create a new site   of the insertion point (where you deleted the text in Step 2).
                              in Dreamweaver.                                     Wherever possible, screen
                                                                                  shots are annotated so you
                                    Project 1: Bistro Web Site  25
                                                                                  can quickly identify important
                                                                                  information.
                                                        Drag the file from the Files
                                                        panel to the location where
                                                        you want to place the image.
                                                5.  In the resulting Image Tag Accessibility Attributes dialog box, type Crowe
                                               Photography in the Alternate Text field.
                                                                Project 3: Photographer's Web Site  119
       iv

